

Opening a Staffing view
Open the Planning page
Select or create a Staffing view
Reading the timeline
Each row is a person (or a project, depending on the grouping). Each bar is a booking: an item scheduled between two dates, shown in its color. The bar displays the booking’s name — the person and project in a Bookings planning, the task name in a Tasks planning — and, when there is room, its date range and the secondary project path.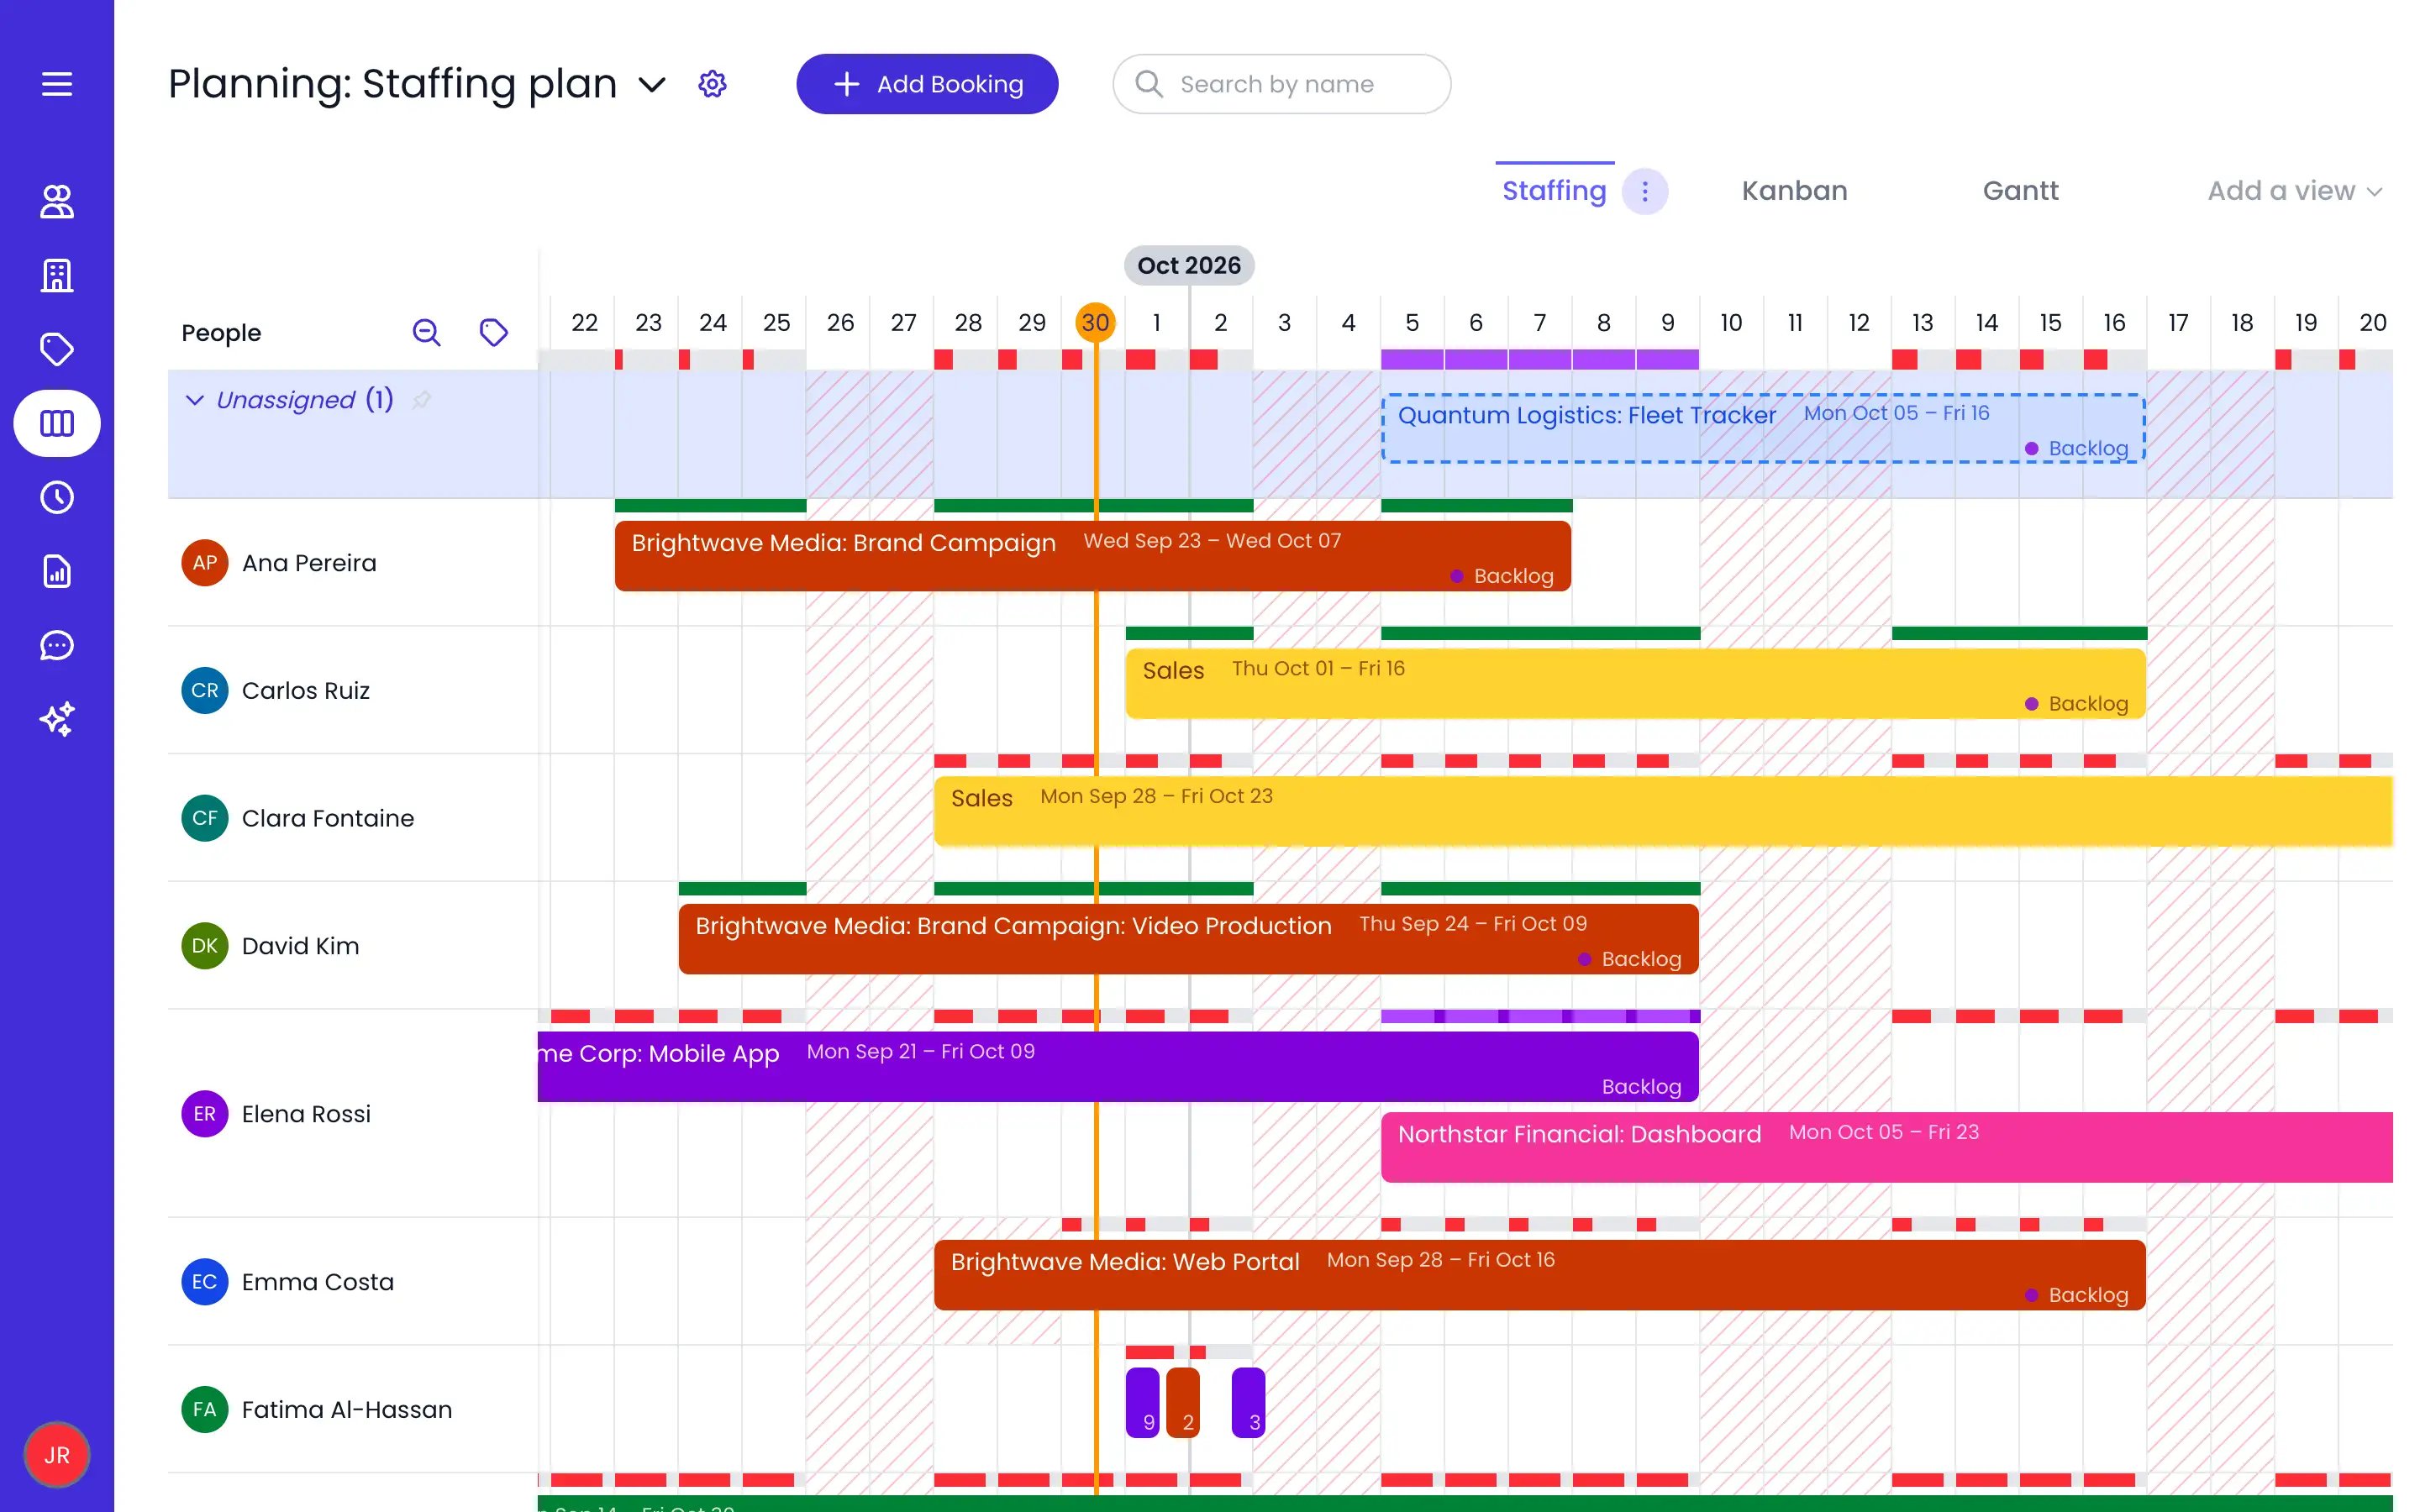
A Staffing view grouped by people: one row per person, the Unassigned row on top, and a load bar per day above each row
- A vertical line marks today; the Today button scrolls back to it.
- The timeline extends into the past as well as the future — keep scrolling left to review earlier plans.
- Bar edges snap to working days, so bookings line up with what people can actually work.
Bookings with hours
A task that carries start and end times is drawn at its real position inside the day column rather than filling the whole day, so a booking from 14:00 to 17:00 sits in the afternoon third of its cell. The stretches the owner does not work — before their day starts, their scheduled breaks, and after their day ends — are hatched behind the bar, which makes a booking placed outside working hours obvious at a glance. Bookings that run past midnight start late in one day’s cell and end early in the next.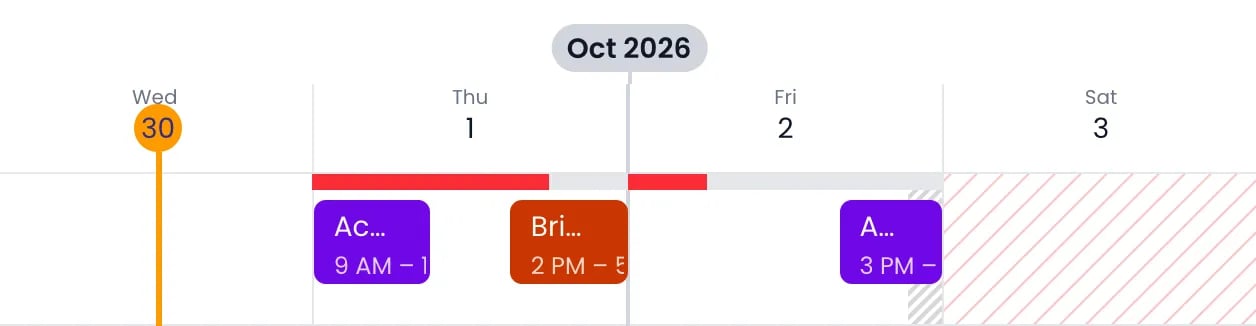
Part-day bookings inside their day: a morning and an afternoon booking on Thursday, and a booking on Friday that runs past the end of the working day
Grouping rows
Open the ⋯ menu on the view tab and use Staffing by to choose what the rows represent:- People — One row per person, with their bookings and a capacity strip.
- A project category — Pick a category, then a level or Lowest level; one row per project at that choice, showing everyone booked on it.
Showing tags on rows
Click the tag button next to Find capacity, at the top of the row column (tooltip Show tags), and pick one or more tag categories. Each row then lists its tags from those categories next to the person’s or project’s name: people rows show the person’s tags, project rows the project’s tags. Shift+click a tag to add it as a filter. Each Staffing view remembers its own choice.Creating a booking
In a planning set to Bookings, a booking has no name of its own: Beebole names it after the person and the project, so the fastest way to staff someone is to book them on a project for a date range. In a planning set to Tasks, the same drag opens an editor that asks for the task’s name first: see Creating a task on the timeline. Tasks or bookings explains how the mode is chosen.Drag on the timeline
Pick the person and the project
Set the allocation
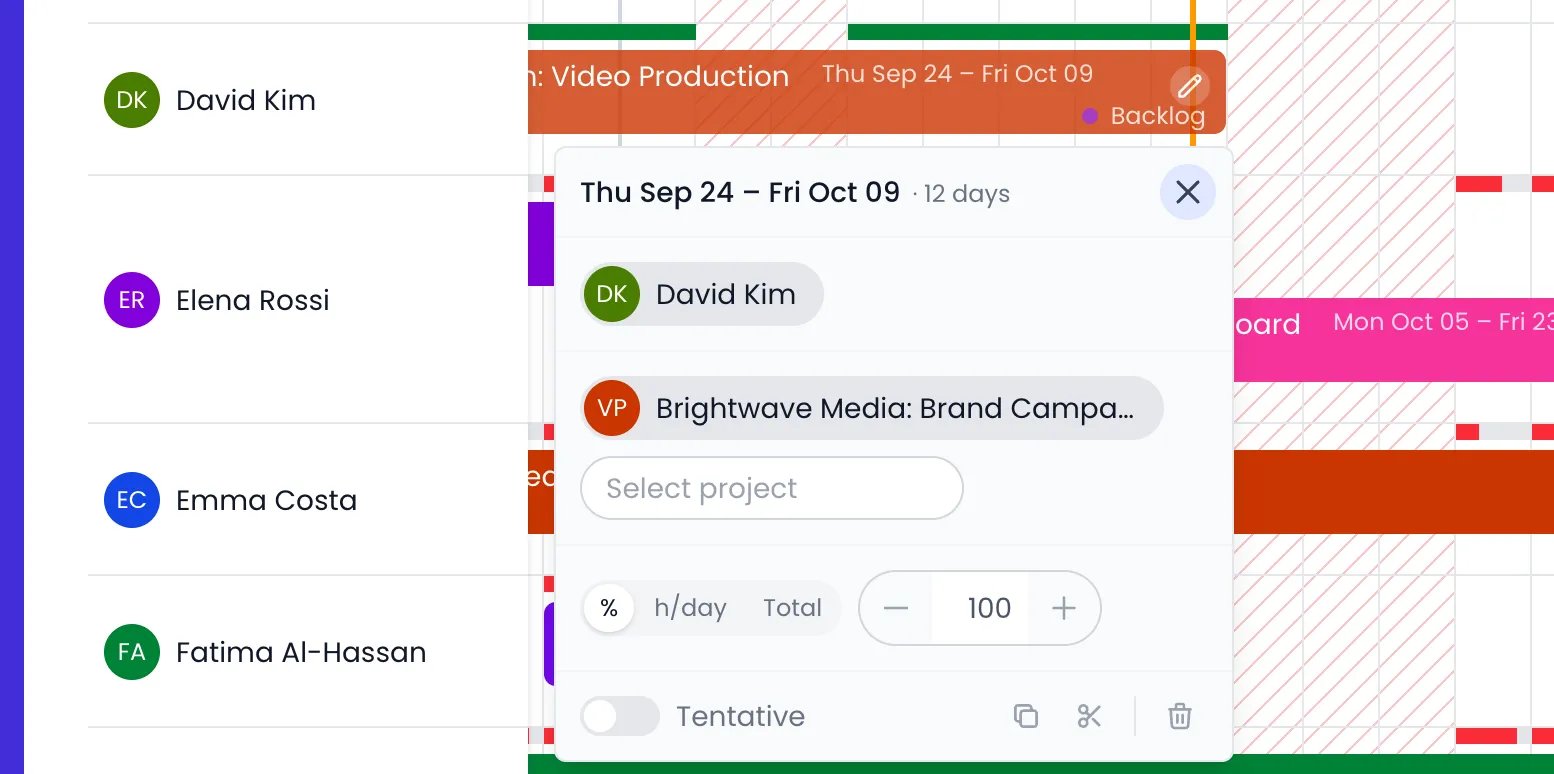
The booking editor under its bar: dates, person, project, allocation, then Tentative and the Duplicate, Split and Delete buttons
Creating a task on the timeline
In a Tasks planning, dragging across a row, or clicking an empty cell, opens the same editor on the timeline for a new task over those dates. It starts with the task’s name, in a field that reads Add a task until you type. Below the dates, it shows the fields the planning uses: the owner (Select the owner), the projects, the tags, and the Planned time. A field counts as used when at least half of the planning’s tasks that aren’t marked done have it filled in. A person’s row also fills in the owner, and a project’s row the project. While the name is empty, it takes the project’s name, which you can type over.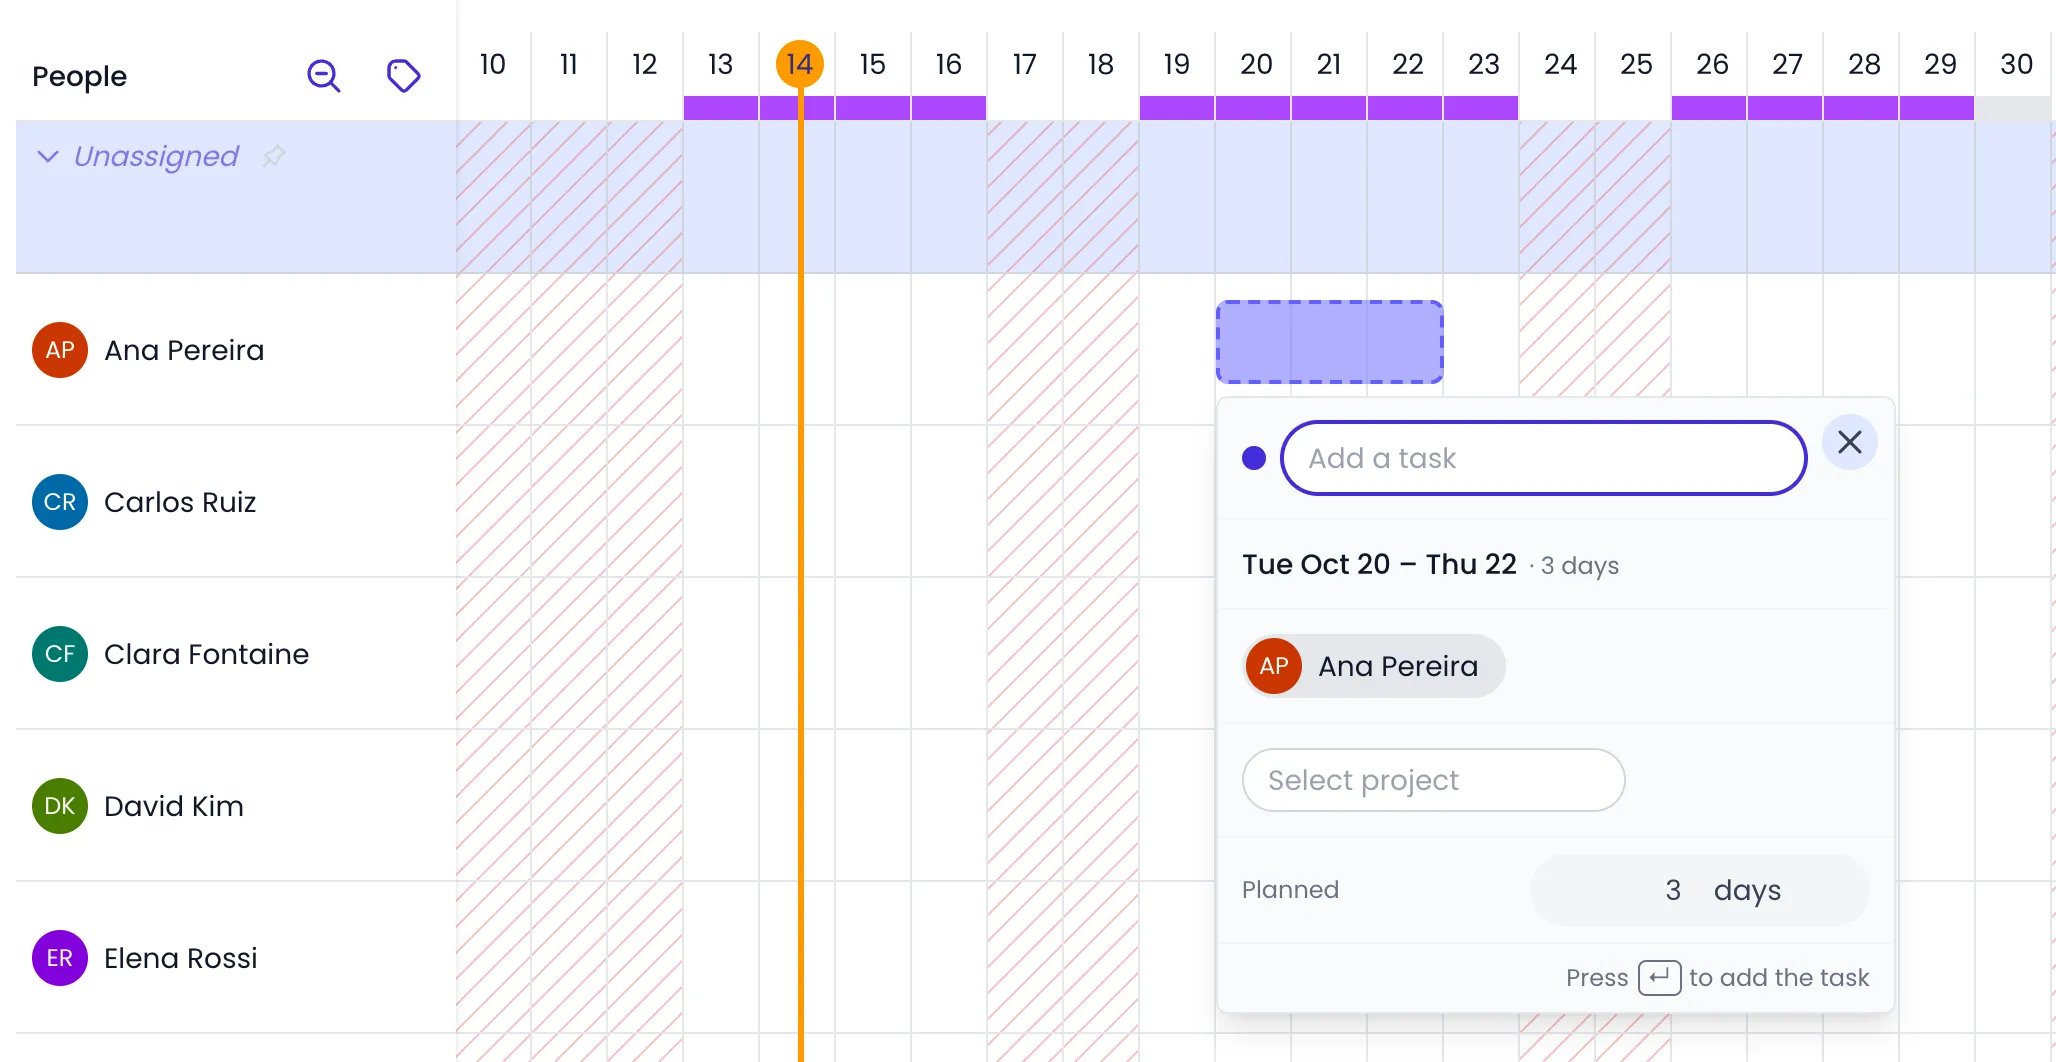
The editor of a new task, opened by a drag across three days of a person's row
Adding a booking without dragging
In a Bookings planning, the Add Booking button at the top of the Planning page opens a form in the side panel. Pick the person (Select the owner) and the project (one of the two is enough), then a date range, the planned time, and the allocation (%, h/day, or Total).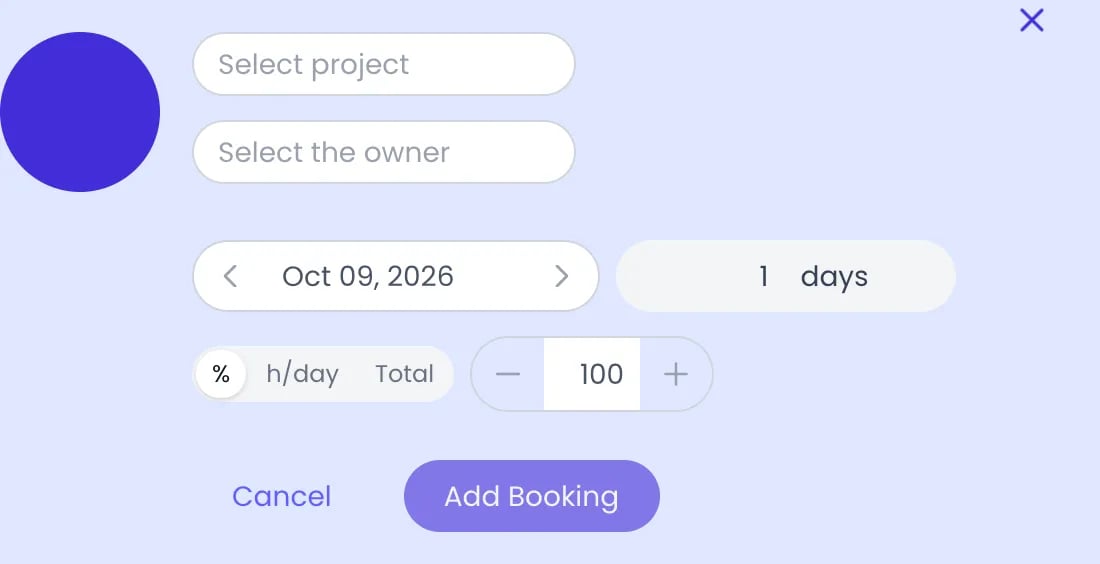
The Add Booking form in the side panel
Tentative bookings
While plans are still firming up, mark a booking Tentative in its editor. A tentative booking is drawn with a hatched style and reserves the person’s capacity, but stays out of reports until confirmed.Splitting and duplicating
From the booking’s editor you can also Split it in two at a chosen date — useful when part of a booking moves — or Duplicate it.Moving and resizing bookings
- Move — Drag a bar left or right to shift its dates. The bar moves by whole days — or by whole weeks when the timeline is set to Infinite by week — so it keeps its exact length and the weekday it starts on instead of snapping to the grid; other bookings restack live as you drag.
- Resize — Drag the left or right edge to change the start or end date. While you drag, the bar shows the planned time its new dates hold. On a timeline that shows days, a booking with hours resizes by the hour: its edge follows the clock of the day it is over, snapped to the quarter hour, and can carry on past midnight into the next days.
- Move between rows — Drag a bar vertically: drop it on another person’s row to reassign the booking, on another project’s row to move it to that project, or on the Unassigned row to clear its owner. A dashed ghost previews where the bar will land, and the whole move is one undo step. The booking’s working time reflows over the destination person’s own schedule and absences.
- Work on several bookings at once — Select multiple bars and drag them together to reschedule the group in one move, hold ⌘ (Alt on Windows/Linux) while dragging to drop dated copies, or grab any selected bar’s edge to shift every selected bar’s dates by the same amount — all undoable as a single step. ⌘-dragged copies land on the row you release them on, each on its own row rather than stacked on the row you dropped on. Press Delete (or Backspace) to remove every selected booking at once, with one Undo in the toast for the whole batch.
- Reach beyond the visible range — Drag a bar to the edge of the timeline and it auto-scrolls, so a booking can be moved or extended past what is currently on screen.
- Reassign — Hover a bar and click its pencil to open its editor, then change the dates (click them at the top of the editor), the person, the project, or the allocation. On a short bar, the pencil sits in a small toolbar that appears under the bar when you hover it, between the two link handles, and the resize edges sit just outside the bar. Clicking the bar itself opens the booking in the side panel. Both the person and the project can be changed on any booking, whether the rows are people or projects. Changes are saved automatically. A new person or project moves the booking to its new row in one step, and the view scrolls to follow it.
Moving a booking inside its day
A booking that runs for part of a single day is dragged on the clock its cell draws. While the pointer stays in that cell the booking follows it hour by hour, snapping to the quarter hour, as on the timesheet calendar — and it lands on hours the owner works, reaching over a lunch break rather than sitting on it. The moment the pointer leaves the cell, the booking moves by whole days instead, keeping the hours it already had, so it never arrives on another day at hours nobody chose. ⌘-dragging a copy and dropping it in the cell it came from puts the copy right after its source: the first free minute of that day, holding as much of the day as the source holds. When there is no room left after it — an all-day booking, one spanning several days, or a day already full — the copy simply lands on its source, as it does elsewhere on the timeline.Dependencies in the Staffing view
Dependency links between bookings are drawn directly on the staffing timeline, color-matched to the tasks at each end, so you can see which bookings depend on which. Moving or resizing a booking cascades to its linked bookings live — dependent bars follow the drag on screen before you drop. If a linked task that moves isn’t visible in your current view, a warning names it so you know what changed and can undo it. See Task dependencies for how links are created.Bookings managed in the Gantt
A task that has subtasks has a schedule the Staffing view must not change: its dates come from its subtasks. When you try to edit one, Beebole shows Managed in the Gantt with the message “This task has subtasks, so its schedule is managed in the Gantt.” Open the Gantt chart to adjust these tasks.The Unassigned row
Planned work nobody has picked up yet sits in the Unassigned row. Drag a booking onto it to clear the owner, or drag one out of it onto a person to assign the work. The row can be collapsed out of the way — its tooltip reads Show these bookings or Hide these bookings — and ⌘-dragging an unassigned booking drops the copy straight onto the row you release it on. Click the pin icon on the row to keep it under the timeline header while you scroll — its tooltip reads Keep this row under the header — so its bars stay within reach when the person you want to drop them on sits further down the list. Click it again (Stop keeping this row under the header) to let the row scroll with the others. Like the collapsed state, the pin is remembered per view. You can also draw a booking straight on the row. Nothing is saved until you pick the person or the project it is for (in a Tasks planning, until you name the task and press Enter or pick a value), so an editor you open and then abandon leaves no stray booking behind — the same as on any other row. The number next to the row label counts the unassigned bookings that fall inside the period you are looking at, not every unassigned booking on record — so it tells you how much work still needs an owner right now. An account-wide reminder can warn everyone involved before an unassigned task starts — see Timesheet and Planning Settings.Locking the view to a period
By default the timeline is infinite — it scrolls by day or week as far as you need. Open the ⋯ menu on the view tab and use Period to lock the view to a fixed window instead:- Infinite by day or Infinite by week — the endless scrolling timeline, at day or week granularity.
- Day, Week, 2 weeks, 3 weeks, 4 weeks, or 6 weeks — the chart fits that window to your screen and shows only the bookings that fall inside it.
Copying the previous period
With the view locked to a fixed period, click the Copy the previous period button next to the period’s dates to refill the current period from the one before it. When the rows are people, choose With people to keep each booking’s person, or Without people to copy the bookings unassigned. When the rows are projects, choose With projects or Without projects to keep or drop each booking’s project. Beebole looks back to the last period that actually holds bookings, not just the one immediately before, and fills every empty period between it and the one you are looking at — so a run of unstaffed weeks is refilled in a single action. Anything that would spill outside the period is clipped. If there is nothing to copy, Beebole says so: No earlier bookings to copy.Finding who’s free
Click Find capacity to search for available people over a chosen period — including forward-looking ranges like By year end and Next 12 months:Workload and capacity
Each person’s row includes a capacity strip: one cell per period comparing their planned load to their available capacity. Capacity comes from the person’s work schedule minus their absences, and each booking counts for its allocation percentage.- Hover a cell to see the numbers — how much is planned against how much is available for that period.
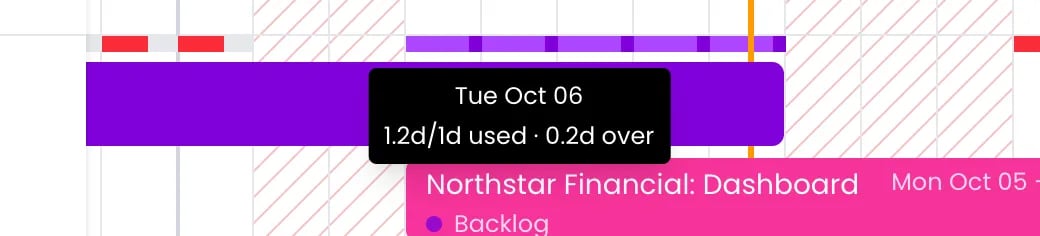
Hovering a load bar: the day, the time booked against the capacity, and the overrun
- Overload — Load bars use a three-color scale: red while capacity remains, green when it is exactly met, and purple as soon as someone is booked beyond 100%. The headcount strip in the timeline header flags overloaded periods for the whole view.
- Step through the load — The strip at the top of the timeline header rolls every row up into one bar per period. Click a period there to step the scroll through the rows driving that period’s load, one at a time. The tooltip says what the click does: Click to step through the overbooked bookings or Click to step through the people with time left.
- Hours or days — Open the ⋯ menu on the view tab and use Durations in to switch every figure between hours and days.
Filtering
Use the Filters button to narrow the view by Task, Status, Owner, Potential owner, Project, or tags (Owner tag, Potential owner tag, Task tag, Project tag), with the active filter count shown on the button. The Staffing view adds Person tag and Person custom field, which narrow the pool of people shown as rows. Filters on people or projects hide entire rows; other filters hide only the bars that don’t match, keeping the row visible. The filters can be switched off and back on without losing them — the button toggles them rather than clearing them.Keyboard navigation
The Staffing view has a keyboard cursor that moves from bar to bar, so you can review and open bookings without the mouse:- Arrow Down / Arrow Up — Move to the closest bar in the lane below or above within the same row, then on to the next or previous row. Rows without bookings, and the Unassigned row while it is collapsed, are skipped.
- Arrow Right / Arrow Left — Move to the next or previous bar in the same lane; when the lane has none, to the nearest bar that lies entirely after (or before) the current one in any lane of the row.
- Enter — Open the task panel for the bar under the cursor; press it again on the same bar to close it. While the panel is open, it follows the cursor as you move.
- Shift+Arrow — Select the bars in the lane between the cursor and the bar you land on, like Shift+Click.
- ⌘+Arrow (Ctrl on Windows and Linux) — Add the bar you land on to the selection, or remove it, like ⌘+Click.
Related content
Tasks
Gantt chart
List view
Work schedules
Planned vs. real report
Frequently asked questions
What is the difference between the Staffing view and the Gantt chart?
What is the difference between the Staffing view and the Gantt chart?
Does a booking need a task name?
Does a booking need a task name?
How does Beebole calculate a person's capacity?
How does Beebole calculate a person's capacity?
Why can't I move a booking in the Staffing view?
Why can't I move a booking in the Staffing view?
Can I make a booking or task repeat every week?
Can I make a booking or task repeat every week?