Accessing Account Settings
The settings page can be accessed via the menu in the top right corner of your account. Here you can manage all aspects of your account, including your subscription, timesheet settings, user screens, group settings, custom fields, regional settings, tasks, absences, and more. The following modules can be used on the settings page. **If a module is not visible, you can add it to the page by clicking “Customize” **in the top right menu and dragging and dropping the module you would like to add:- Absences: Create new absence types.
- Account: Manage your subscription and integrations, download your data and invoices, etc.
- Authorizations: Edit default authorizations for employees, managers, and other roles.
- Custom Fields Settings: Create custom fields for any entity (customers, projects, employees, etc.).
- Custom Module: Embed customizable static or dynamic content, including text, documents, images, video, or web pages using HTML.
- Export Settings: Configure the format of your PDF exports, which can be used to create branded reports.
- GDPR: Manage data and settings related to GDPR obligations for European countries.
- Group Settings: Create groups, such as departments, locations, employee types, etc.
- Holidays: Define public holidays.
- Import: Bulk import all entities and additional data to Beebole rather than adding them manually.
- Localization: Define regional settings.
- On Time Settings: Configure the On Time feature to motivate employees to submit their timesheets.
- People: Shows a list of all people in your company and can be used to add people.
- Projects: Shows a list of all projects in your company and can be used to add projects.
- QuickBooks Export and QuickBooks Settings: Modules used to export hours recorded in Beebole as a Timer IIF file and imported to QuickBooks for Windows.
- Report: Run reports in a table format.
- Schedule Assignment: Assign existing schedules to employees.
- Schedule Settings: Define the default schedule and create advanced schedules.
- Tasks: Create new tasks.
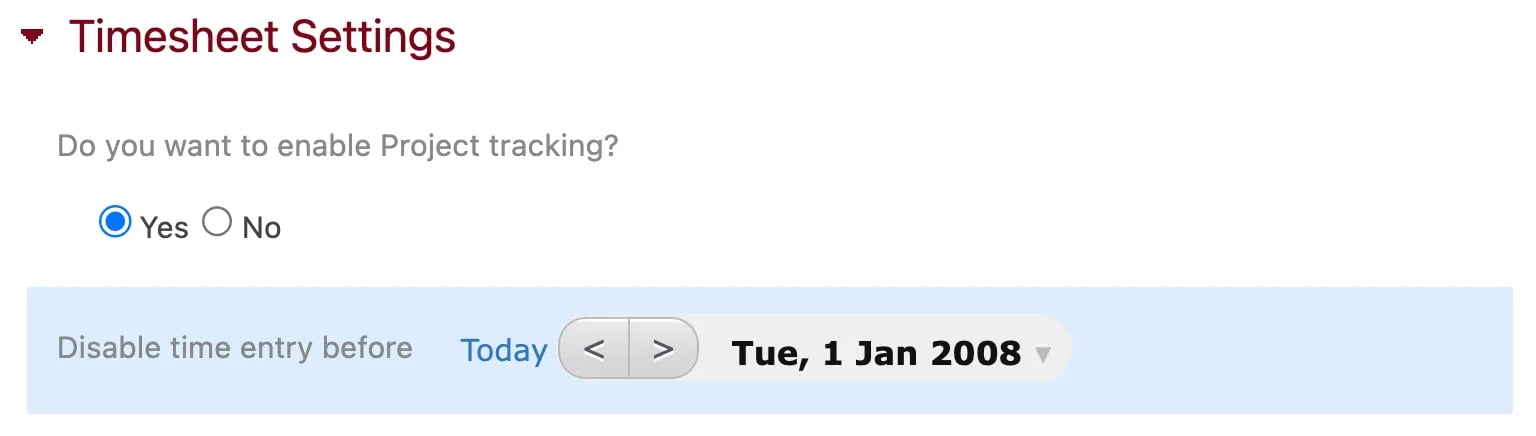
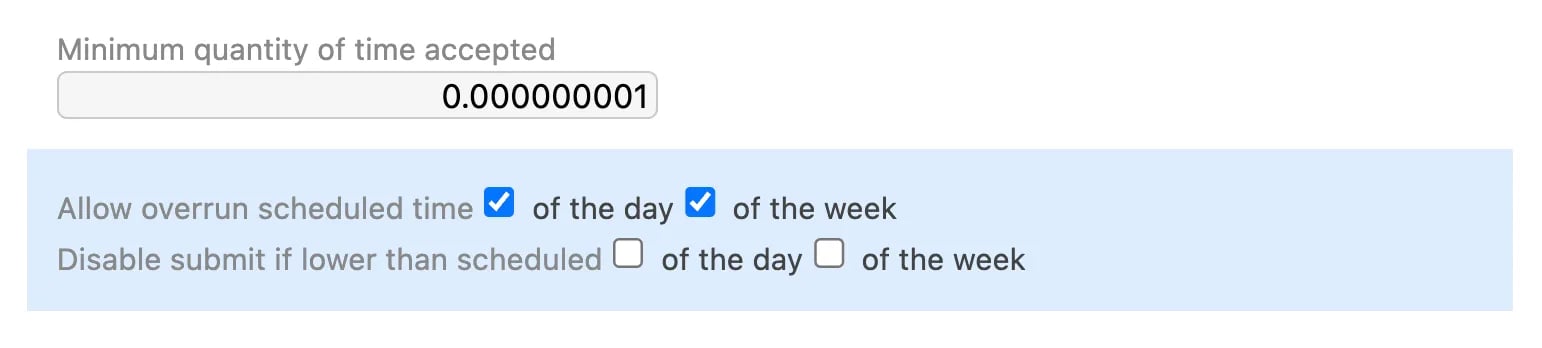
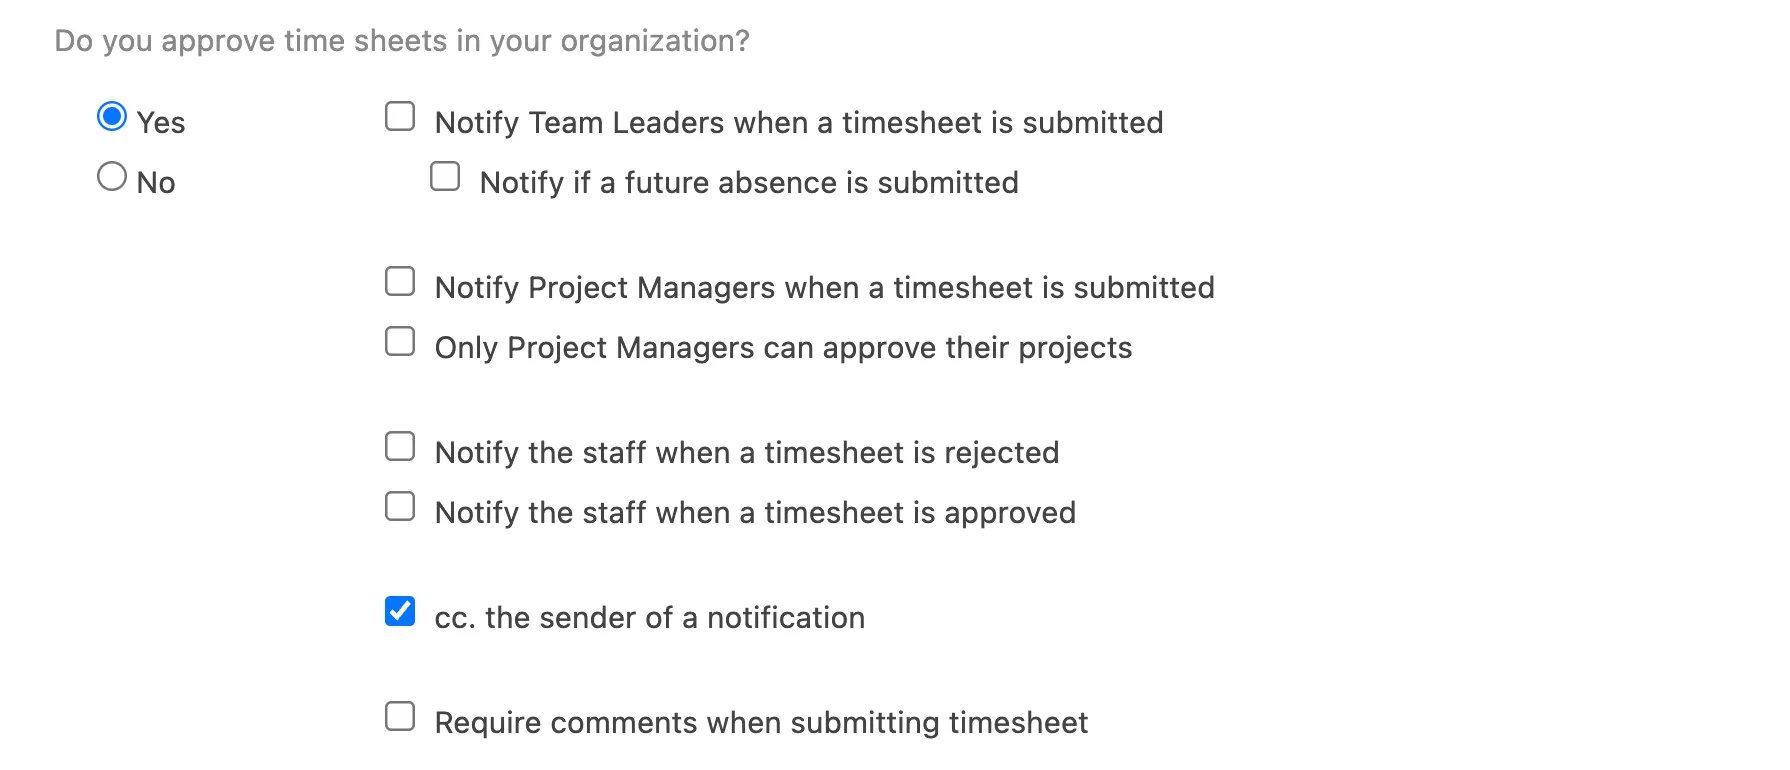
- Timesheet Settings: Manage timesheet behavior, reminders, approvals, notifications, and more.
- User Screens: Define new default screens for your users.
Managing Your Subscription
Manage your Beebole subscription using the Account module in the Settings screen. You can also use this module to enable API calls, manage your integration with Google Workspace, download audit trails and other timesheet data, and more. By clicking Subscription, you can modify the number of users in your account, change your subscription period (up to one year), make payments, edit or remove payment info, and turn your account into a free account (for a single user).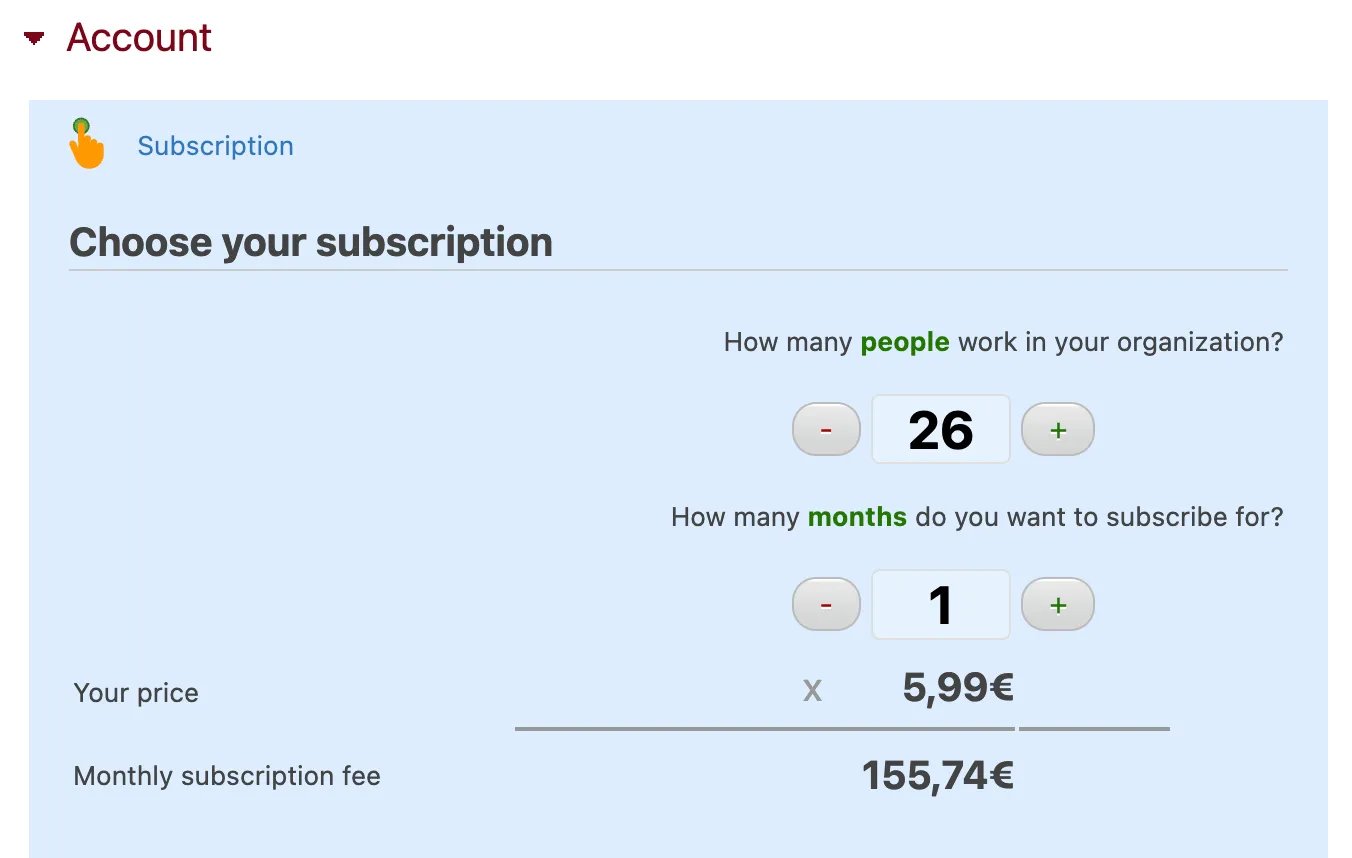
Download Billing Data
To download your account billing data, use the Account module in the Settings screen. Click Invoice History to download all invoices from your subscription payments. Invoices are also sent to you via email when payments are processed.Download Audit Trails and Other Timesheet Data
You can download audit trails, SOX reports, project overviews, and other timesheet data by clicking Download your data in the Account module, which can be found in the Settings screen.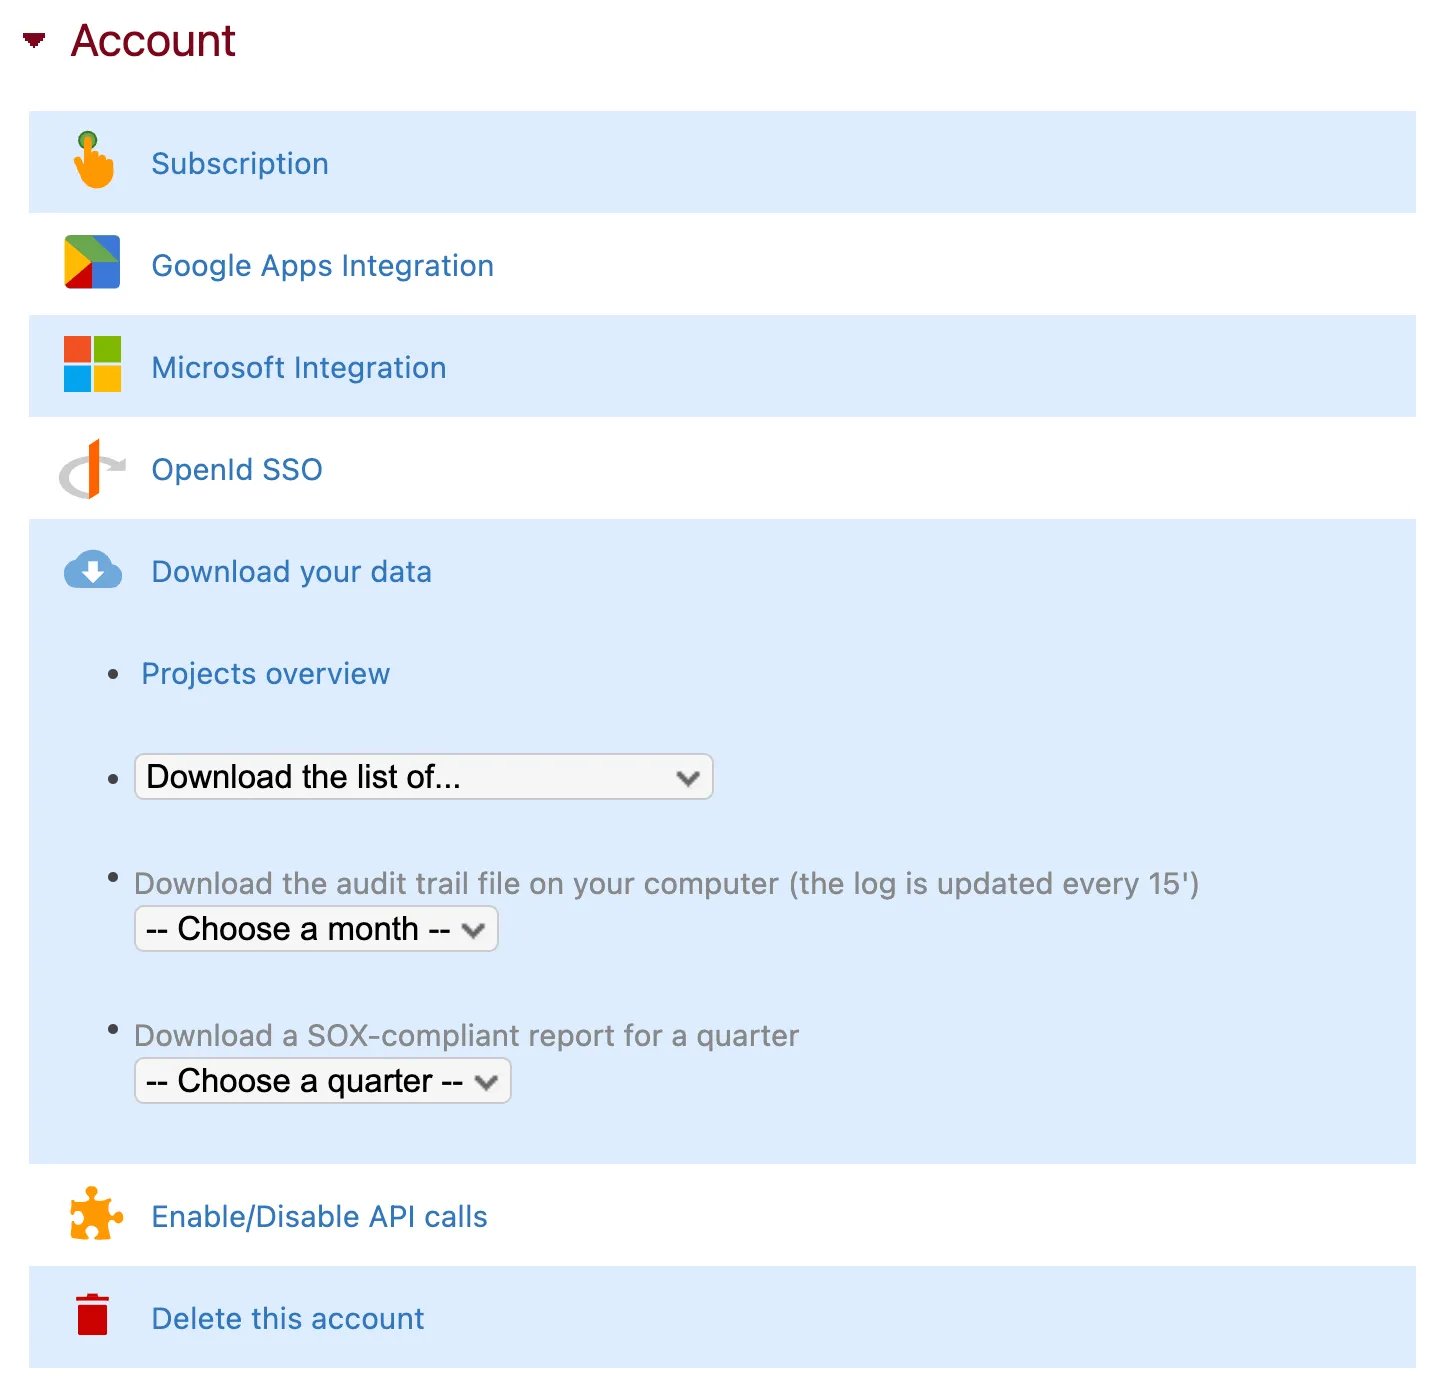
Managing Google and Microsoft Integrations
If you already have a Beebole account, you can link it with your Google Workspace domain under the Google Apps Integration section of the Account module, which can be found in the Settings screen. Check our documentation to learn more about linking your account with Google Workspace. If your company uses Microsoft 365 or Microsoft Azure, you can require users to sign in exclusively using the Microsoft SSO (Single Sign On) integration by going to the Microsoft Integration section of the Account module, which can be found in the Settings screen. In our documentation you will find more information about integrations with Microsoft 365 or Microsoft Azure.Using OpenID SSO (Single Sign On)
You can use the OpenID SSO section of the Account module, available in the Settings screen, to enable Single Sign On** with multiple SSO solutions** such as OKTA, OneLogin, and more. The supported technology is OpenID Connect/OAuth2.0.Enabling API Calls
You can enable or disable API calls to your Beebole account by going to the section Enable/Disable API calls*** ***in the Account module found in the Settings screen. Take a look at Beebole’s API documentation for more information.Timesheet Settings Module


Why Start and End Time Matter in Employee Time Tracking
Reasons you may want to require a timer for your team’s time tracking (including legal compliance)
Creating Custom Fields
Custom fields can be applied to any entity (projects, customers, people, etc.) and allow you to expand on Beebole’s standard fields with other values such as external IDs, project information, and more. The custom fields you create will also be available in reports. You can add new custom fields using the Custom Fields Settings module, which appears by default in the Settings screen of account administrators. Just click “Add a custom field”, give the new field a name, and then select which entity or entities it will be used for. You can edit or remove a custom field by hovering over it and clicking “Change” or “Delete”.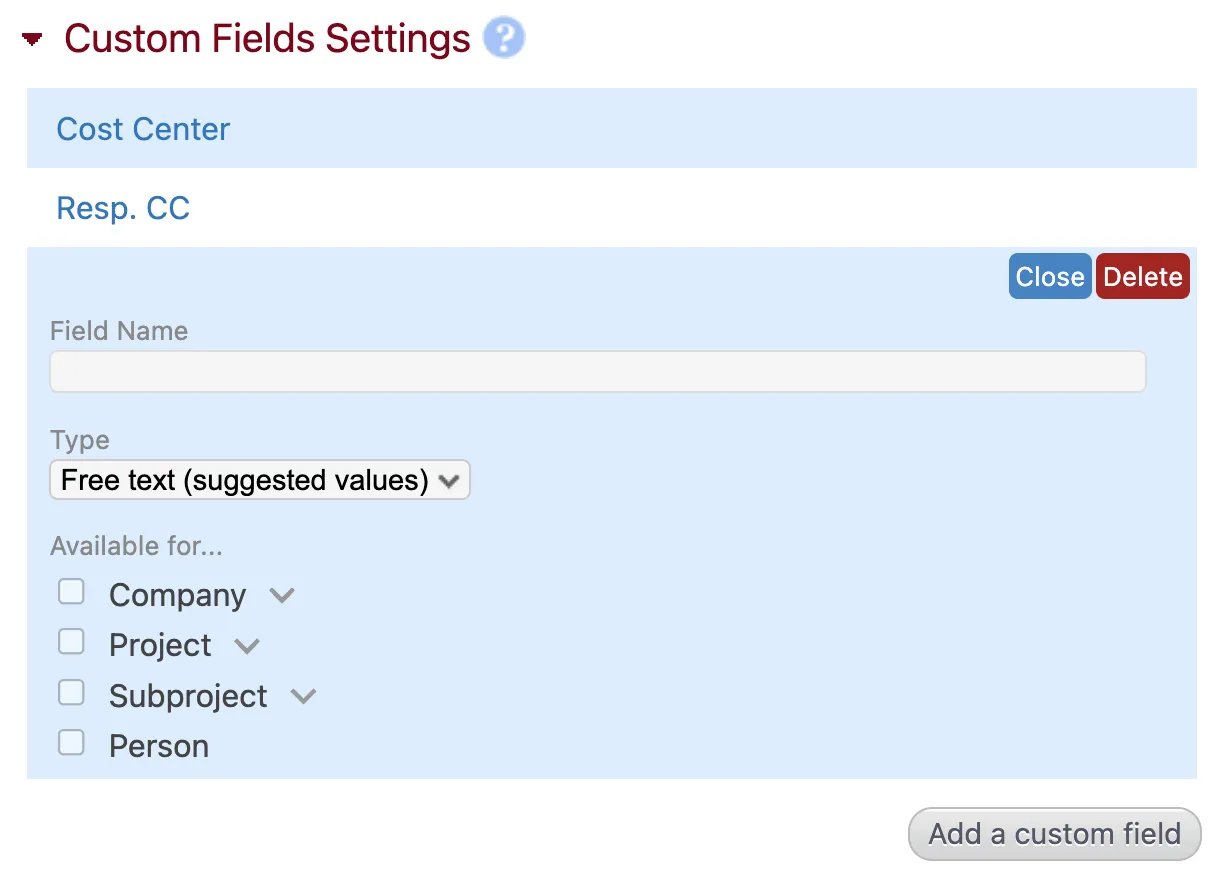
Localization
The Localization module can be found in the settings screen and allows you to define your regional settings. You can also use this module on company branches or for individual employees that require a unique localization configuration. To add the module to a screen, click “Customize” in the top right corner and drag and drop the module anywhere on the page.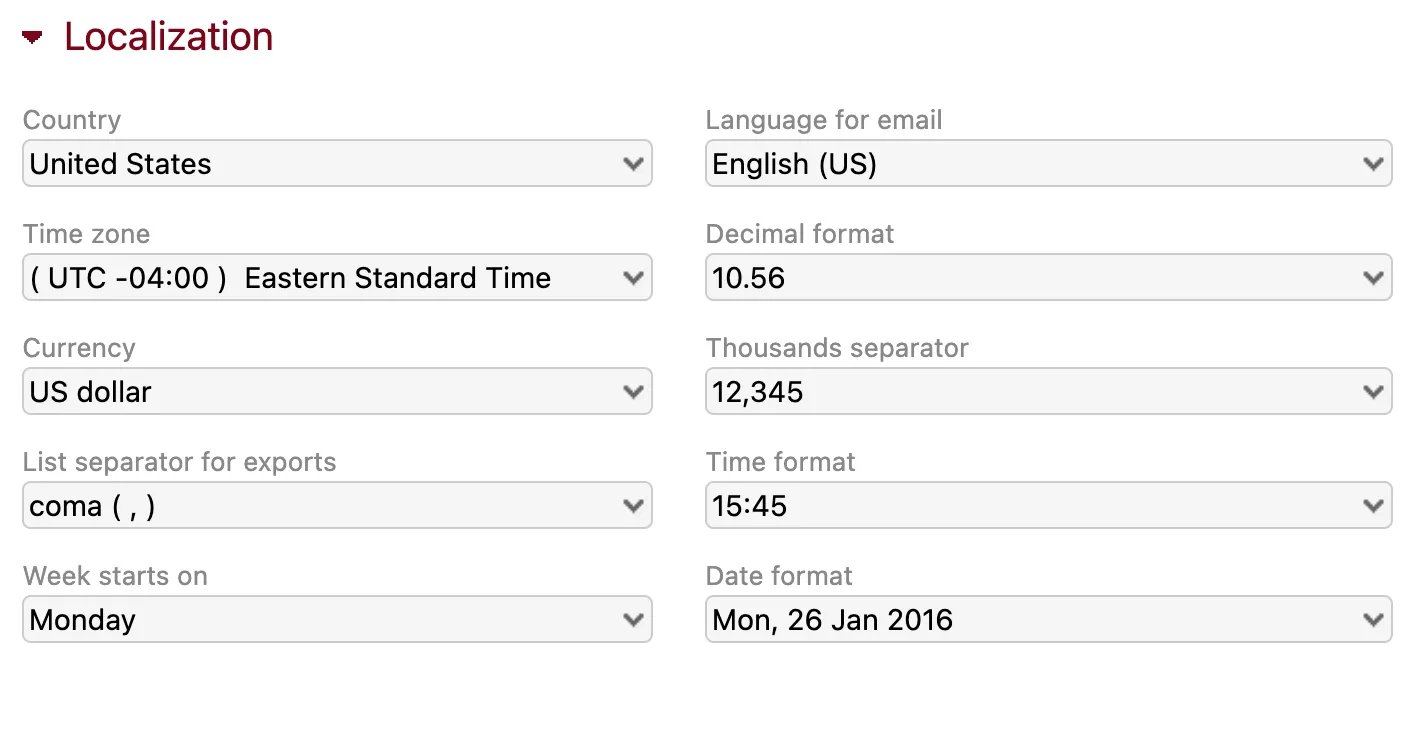
- The country where your company is based.
- The language you would like used in emails sent by the system, such as reminders, user invitations, approval emails, etc. These emails can be further configured in the Timesheet Settings module.
- The time zone where your company is based.
- The decimal format you would like used for numbers in the interface, reports, and exports.
- The main currency your company works in.
- The thousands separator you would like used for numbers in the interface, reports, and exports.
- The list separator (”,” or ”.”) you would like used in the files that you export from Beebole depending on the regional configuration of your spreadsheet tool. When you open a CSV file exported from Beebole, if all data is shown in a single column you can try changing this parameter and re-exporting.
- The time format (a 12-hour clock or 24-hour clock) you would like to use in the interface, reports, and exports.
- The day that the working week starts on. This will change the way weeks are presented in your Timesheet module.
- The date format you would like used in the interface, reports, and exports. This should coincide with the regional settings of your spreadsheet tool to ensure that dates are displayed correctly in exported files.
- The non-working days (or weekends) for your company. Non-working days will be gray in the Timesheet* and Team Calendar modules. They are also used for the On Time *feature, as on time checks are not performed on non-working days.
GDPR
On our website you will find more information about Beebole’s policy and practices relating to GDPR, or The General Data Protection Regulation. The GDPR module will appear by default in the Settings screen of your Beebole account. As with all modules, the GDPR module can be minimized or dragged and dropped anywhere on the Settings screen.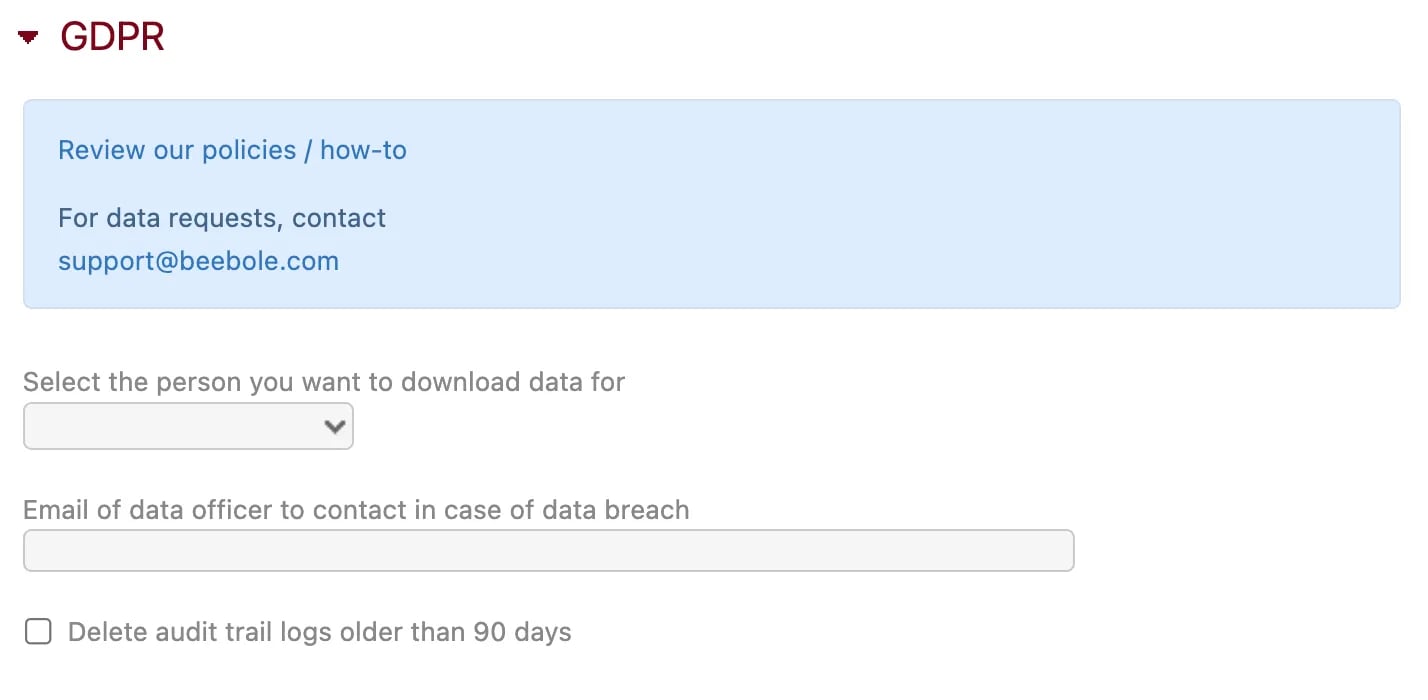
How to Customize Screens
You can customize your own Beebole interface by clicking “Customize” in the top right corner and dragging and dropping modules wherever you want them to appear on each screen. For example, you can add multiple Chart & Table modules to your home screen to create a personalized KPI dashboard featuring your most viewed reports. To **modify the default screens for different **user groups (employees, team leaders, etc.) use the User Screens module, which is available in the Settings screen. Create a template and assign it to a group of users with the following steps (note, you must be an administrator):- Add a new user to the system and give it a name like “employee template”, “team leaders screen”, or whatever name will help you refer back to it later. For the user email, you can also use a placeholder like “employee_template” and select any user group from the dropdown menu.\
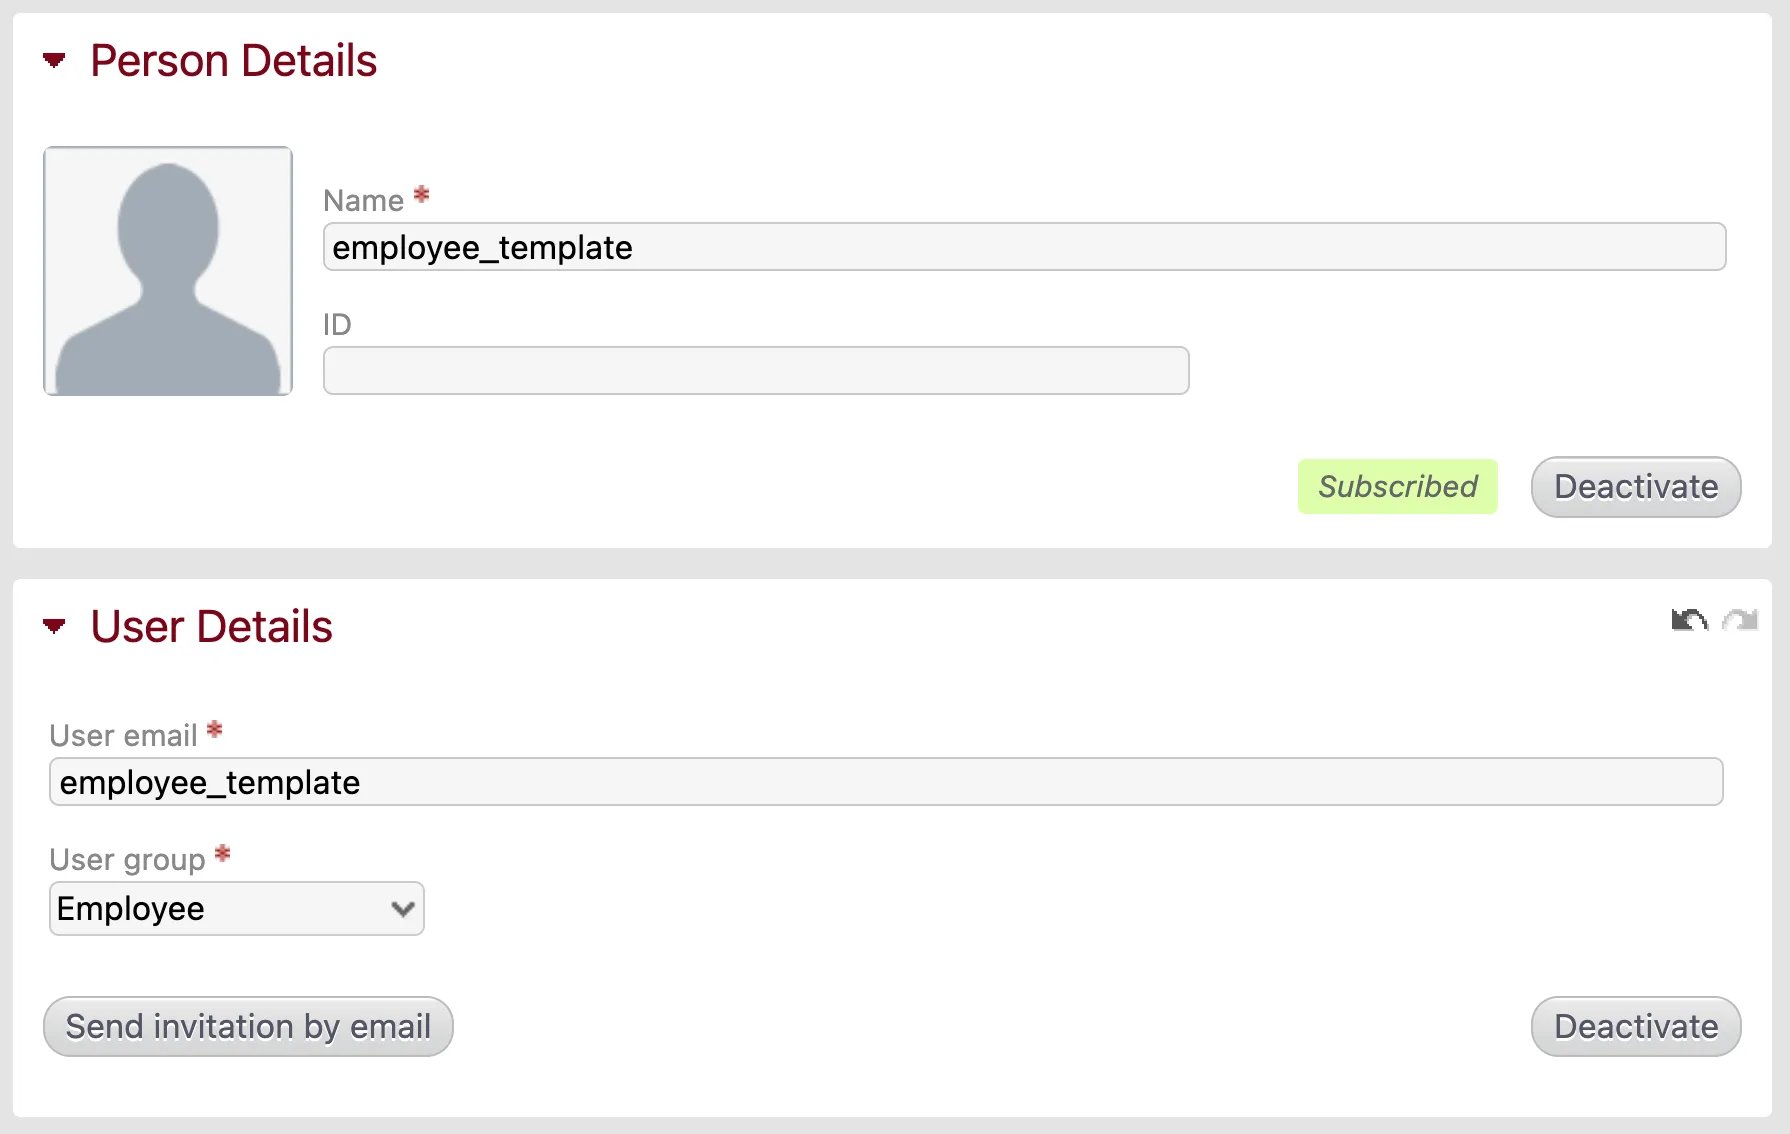
- Click “Send invitation by email” and copy the sign in link that appears in the green box.
- Sign out of your own account and paste the copied link into your web browser. Create a password to log into the new template account.
- Customize all of the screens that you would like to apply as a default for the given user group. You can customize any and all of the screens you want, and return to this template account whenever you want to update or change the default screens for this user group.
- Sign out of the template account and sign back into your own administrator account.
- Click “Settings” in the top right corner and add the User Screens module to the page.
- Select the group from the first dropdown menu and select the template account from the second dropdown menu. All users in the selected group will now see the default screens that you configured in the template account.\
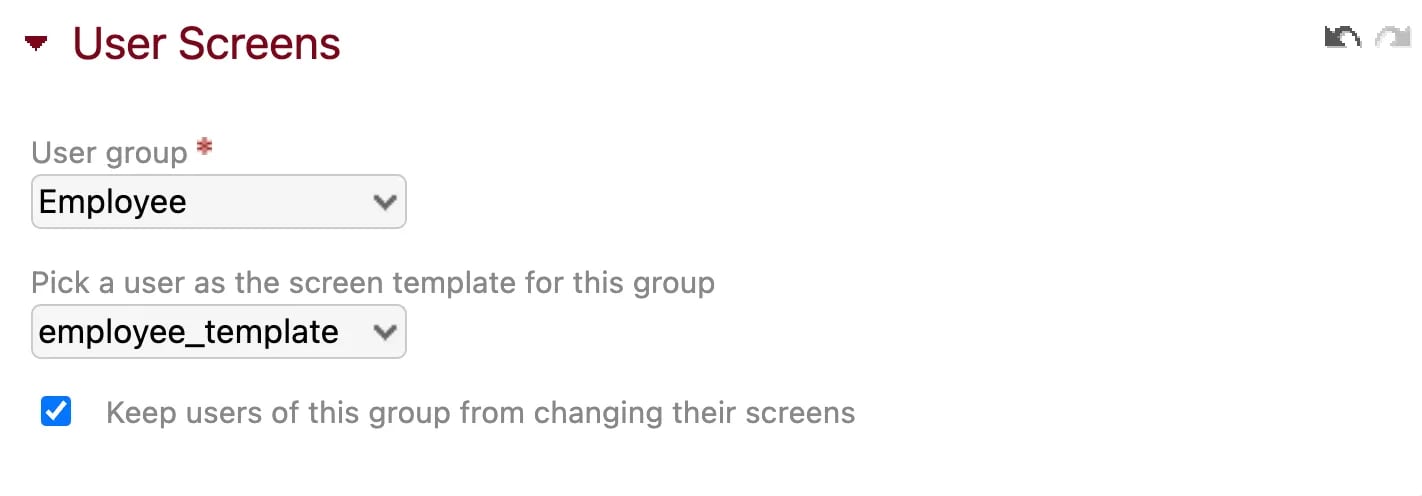
- If you do not want users in a given group to be able to change their default screens, tick the box labeled “Prevent users of this group to change their screens”.
- If you allow users to edit their screens, any changes they make will take priority over the default template. Therefore, their screens will not be automatically updated when you update or edit the template. If a user wants to re-apply the default template, they should click “Customize” in the top right corner, select the “Your screens” tab and click “Reset all screens”.
- You must deactivate template accounts to prevent them from being included in your subscription. To do so, go to the page for the template account and click “Deactivate” in the Person Details module and then click “Activate” in the *User Details *module.
Importing Data
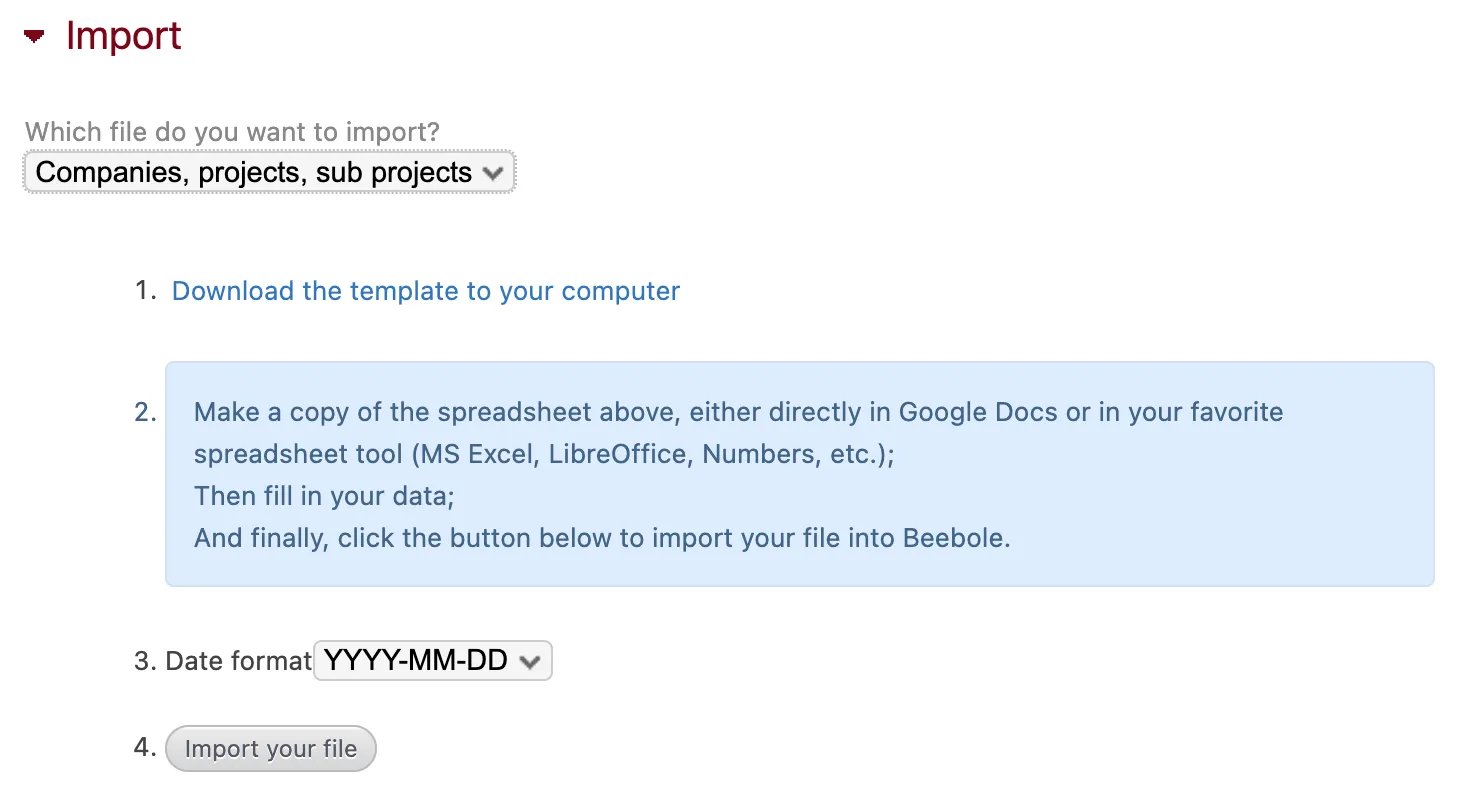
You can bulk import all entities and additional data to Beebole rather than adding them manually using the Import module. Specifically, the module can be used to import the following:- Companies, projects, subprojects
- Tasks
- People data
- Teams
- Project managers
- Absence quotas
- Absence entries
- Time entries
- Group assignments
- Specific tasks
- Exclusive members
- Standard costs
- From the dropdown menu, select which file or type of information you would like to import.
- Click the link that appears that reads “Download the template to your computer”. This will download a CSV file with the correct columns and formatting required to import your data to Beebole. Alternatively, you can use the Google Sheet links provided above and make a copy of the spreadsheet.\
- You’ll see that some information is already added to the spreadsheet as an example. Where there is an orange corner on a header box, mouse over it to see tips or suggestions.
- Fill in and save your data. Columns that are flagged as “Optional” may be left blank, but note that there is a hierarchy to the data. This means that if you import projects, for example, you also need to fill out the column for companies. If you import subprojects, you need to fill out the column for projects.
- Go back to the Import module and select the date format of your spreadsheet. Then click “Import your file”.
- When importing data that already exists in your Beebole account, be sure the spelling matches exactly, otherwise, new entities will be created.
- We recommend starting a new import with just a few lines, especially if it’s your first time using the module. This way you can check that the information is correct before importing large amounts of data.