How to Start Using Beebole
What are entities and how to organize your work
Your Beebole account is made up of different entities, which are the elements used to organize your work, tracked time, costs, billing, etc. They are:- Company: your own organization, branches, customers, etc.
- Person: the individuals that work for your company (employees, contractors, administrators, etc.).
- Project and subproject: to organize the work you do for your own company or for different customers.
- Task: a way to organize your work globally and in combination with projects/subprojects and companies.
- Absence: vacation, sick leave, etc. but not including public holidays.
Navigation
Beebole’s dashboard is made up of modules. Certain modules appear by default on different pages depending on a user’s role and authorizations. You can add modules to a screen by clicking “Customize” in the top right corner and dragging and dropping the deleted module anywhere on the screen. To delete a module, click “Customize” and then click on the red “X” that appears in the top left corner of the module you want to remove. To navigate your Beebole account on desktop:- Access the home screen by clicking the home icon in the top left corner. A user’s home screen will look different depending on their user group and permissions, but most importantly it is where all users will find their timesheet.
- Access the Settings page via the menu in the top right corner of your account. Here you can manage all aspects of your account including your subscription, timesheet settings, schedule settings, user screens, group settings, custom fields, regional settings, tasks, absences, and more.
- Use the search bar at the top of the screen to navigate to any entity (companies, projects, people, etc.).
- Use the Recent module to view and navigate to recently visited entities. The module will show the last companies, projects, or employees you have viewed, with a maximum of 10 for each entity type. Click an entity name to navigate to its page. Click “Show all” to view all entities in your account. By default, only active entities are shown; click “Show Inactive” to display both active and inactive entities. To reset the module, click “Clear recents”.
- You can also navigate between entities by using the links that appear within certain modules. For example, when looking at the Project Details module on a project’s screen, the company that this project belongs to will appear. If you click the name of the company, you will be taken to the company’s screen.
- Beebole’s dashboard displays breadcrumbs in the top left corner that show you exactly where you are located and the path you took to reach that location. You can click the entities that appear in breadcrumbs to be taken to their screen.
Choosing the best entity hierarchy for your organization
Before you start using Beebole, it’s important to decide how you are going to organize your account. The platform lets you configure companies, projects, subprojects, and tasks, but not all Beebole users categorize their work in this way. In reality, these entities can be whatever you want them to be, and you can get creative with this hierarchy to organize work in a way that makes the most sense for your organization. For example, some Beebole customers use it for manufacturing tracking, with their products configured as projects. Another customer uses it to track clinical trials. The sky’s the limit. If you need help choosing the best configuration to meet your needs, just reach out to us.The first step: adding entities to your dashboard
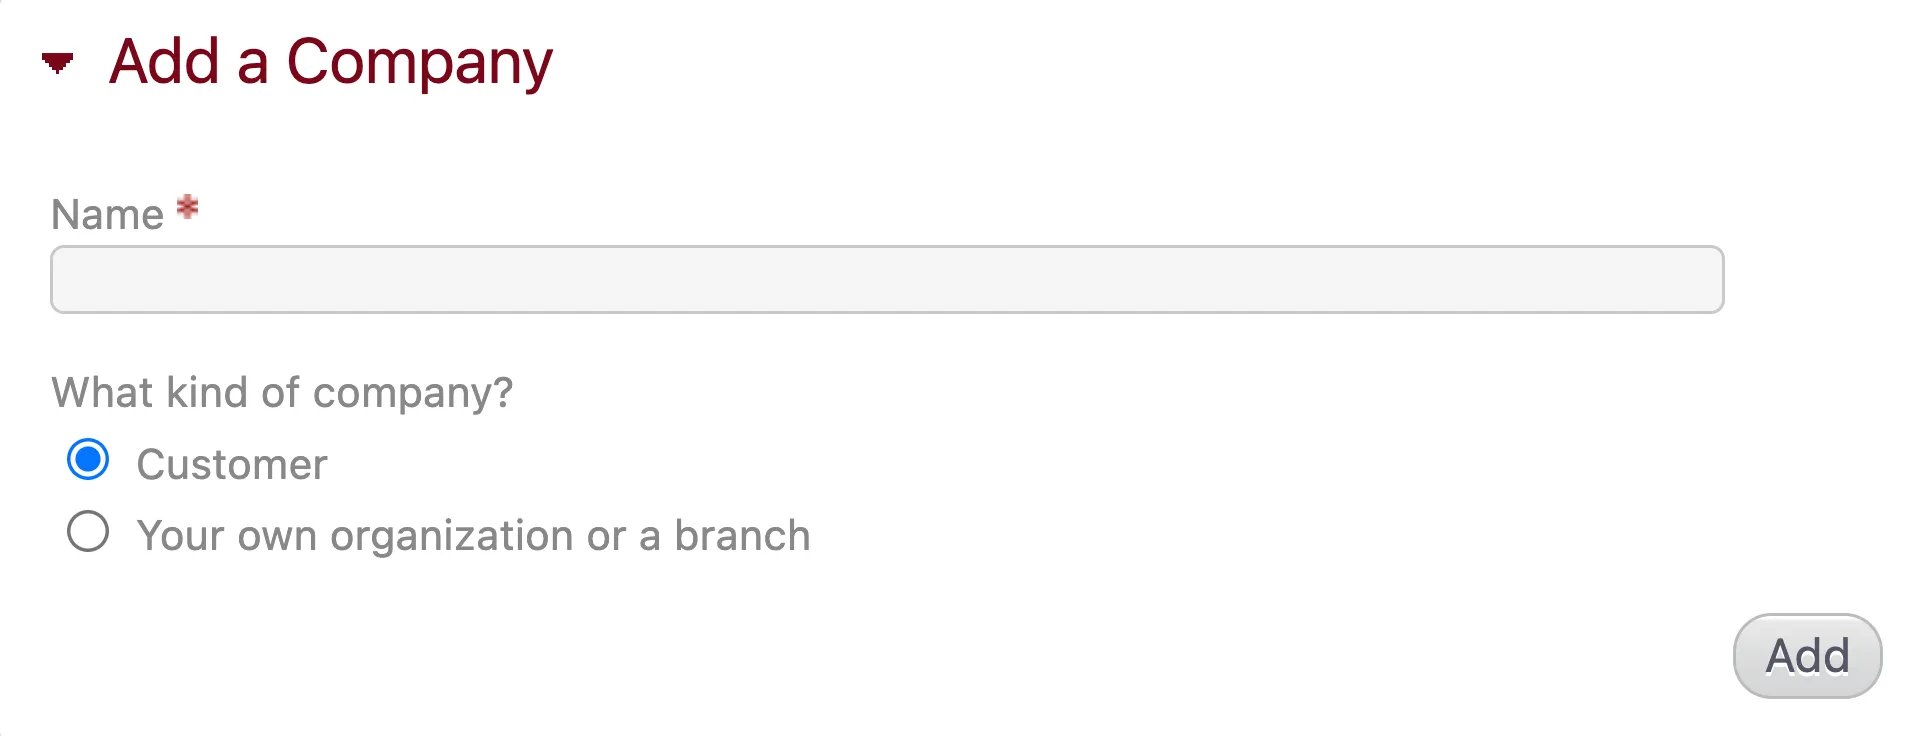
There are many features to discover on Beebole, but these are **the first steps you should take **to learn your way around the dashboard. First, if you are not already on the homepage, click the icon in the top left corner of the dashboard to go there. We also recommend defining an entity hierarchy for your organization before you get started.- In the Add a Company module, enter the name of a customer, client, or branch of your own organization. (Note that your own company was already automatically added when you created your Beebole account.) Select whether the company is a customer or branch, and click “Add”.\
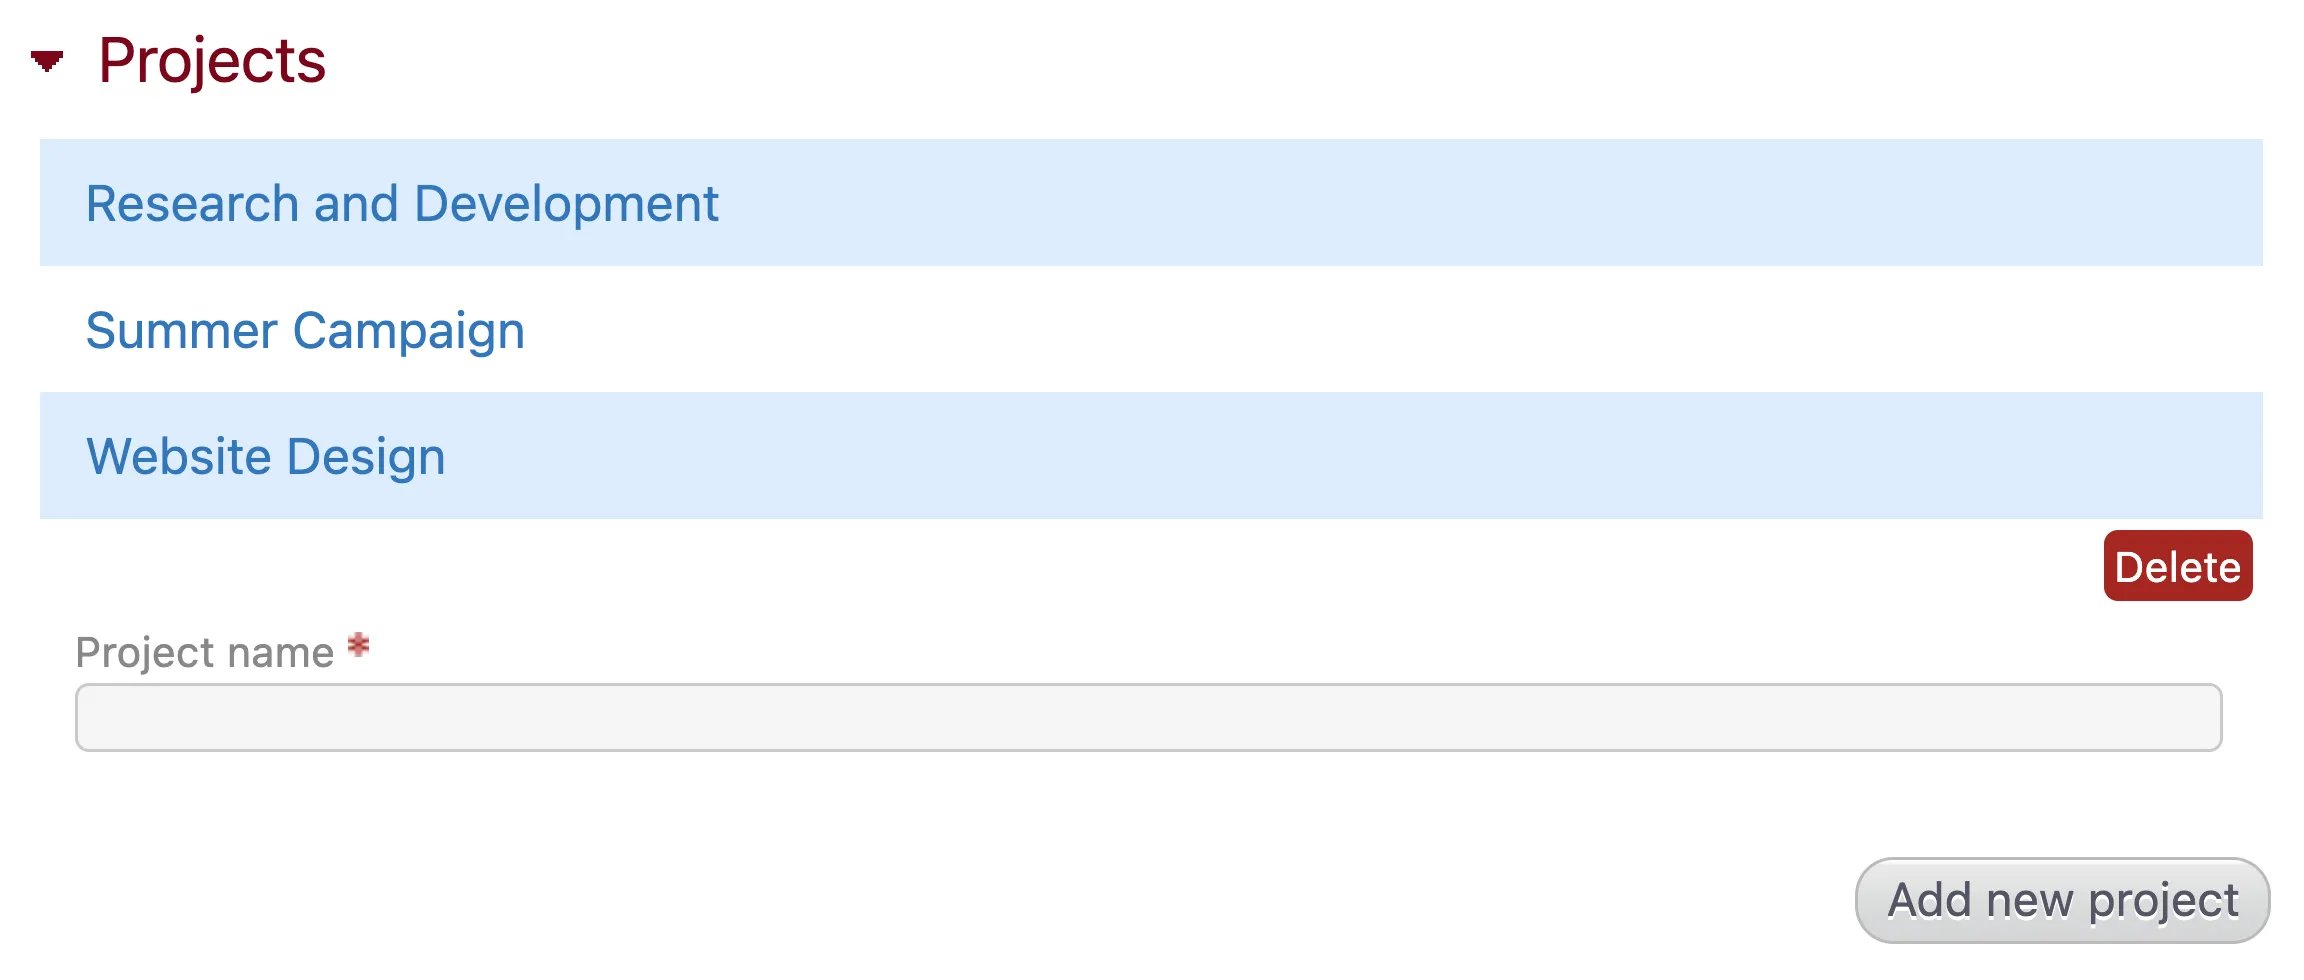
- Adding a company will automatically bring you to its screen, where you will find the Projects module. Click “Add New Project” as many times as you need to add projects for that customer or branch. If you click “display” it will bring you to the page for that project, where you can also add subprojects. You can perform these same steps on your own company’s page to create internal projects and subprojects.\
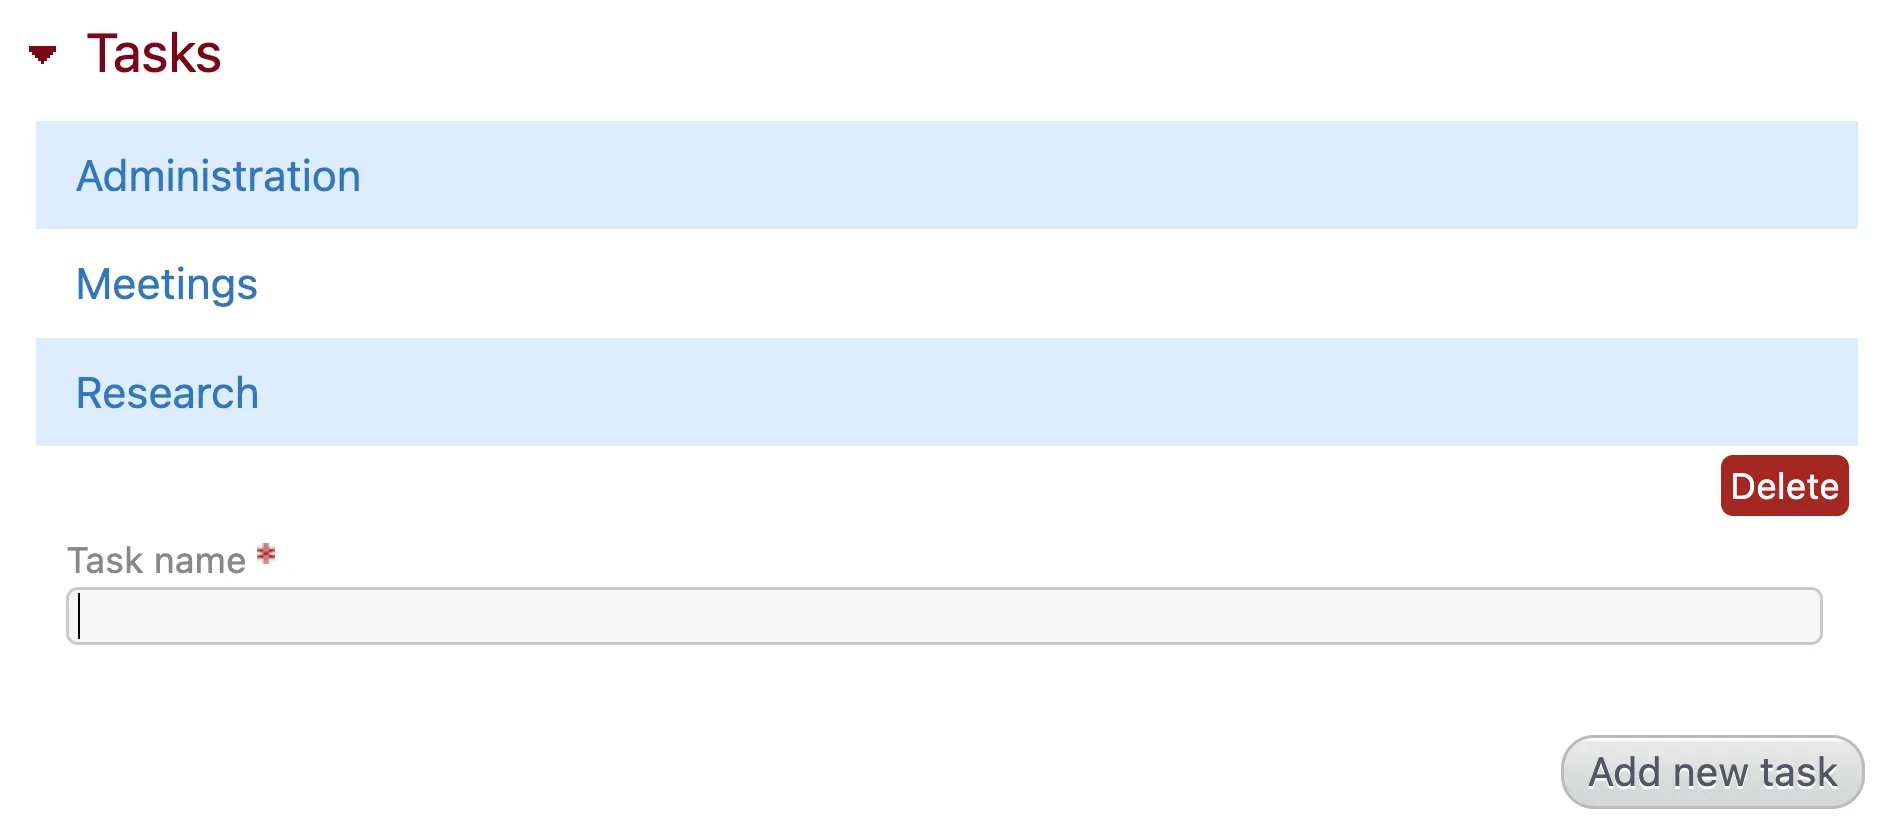
- Click “Settings” in the top right corner of the page and locate the Tasks* *module. Tasks will appear across all customers and projects, so they should be generic activities. The tasks “Administration”, “Meetings”, and “Research” already exist by default but can be edited or deleted. Click “Add new task” as many times as you need to create more tasks.\
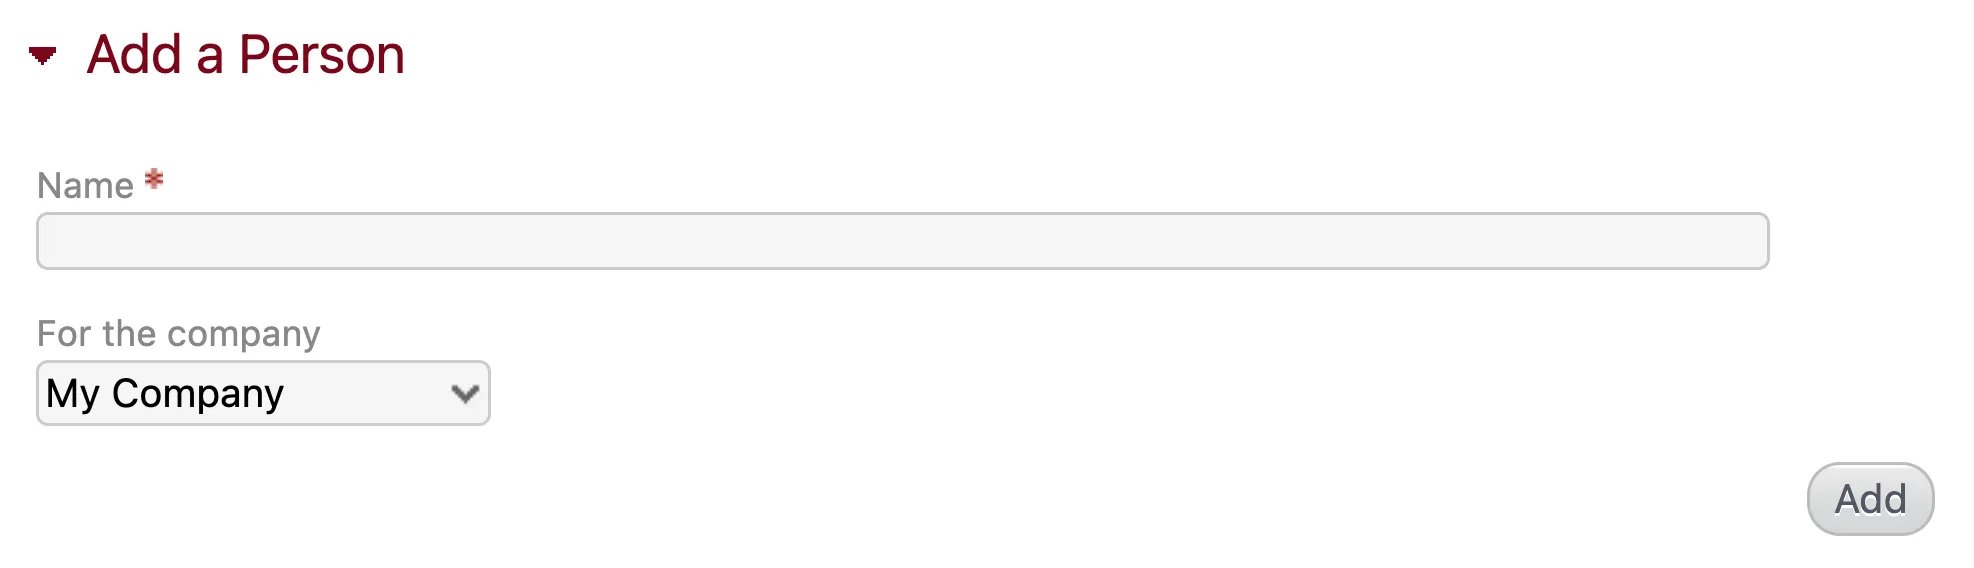
- To invite team members to Beebole, go to the home screen and locate the Add a person module. Enter the person’s name and click “Add”. You will automatically be taken to the page for the person, where you can edit various settings.\
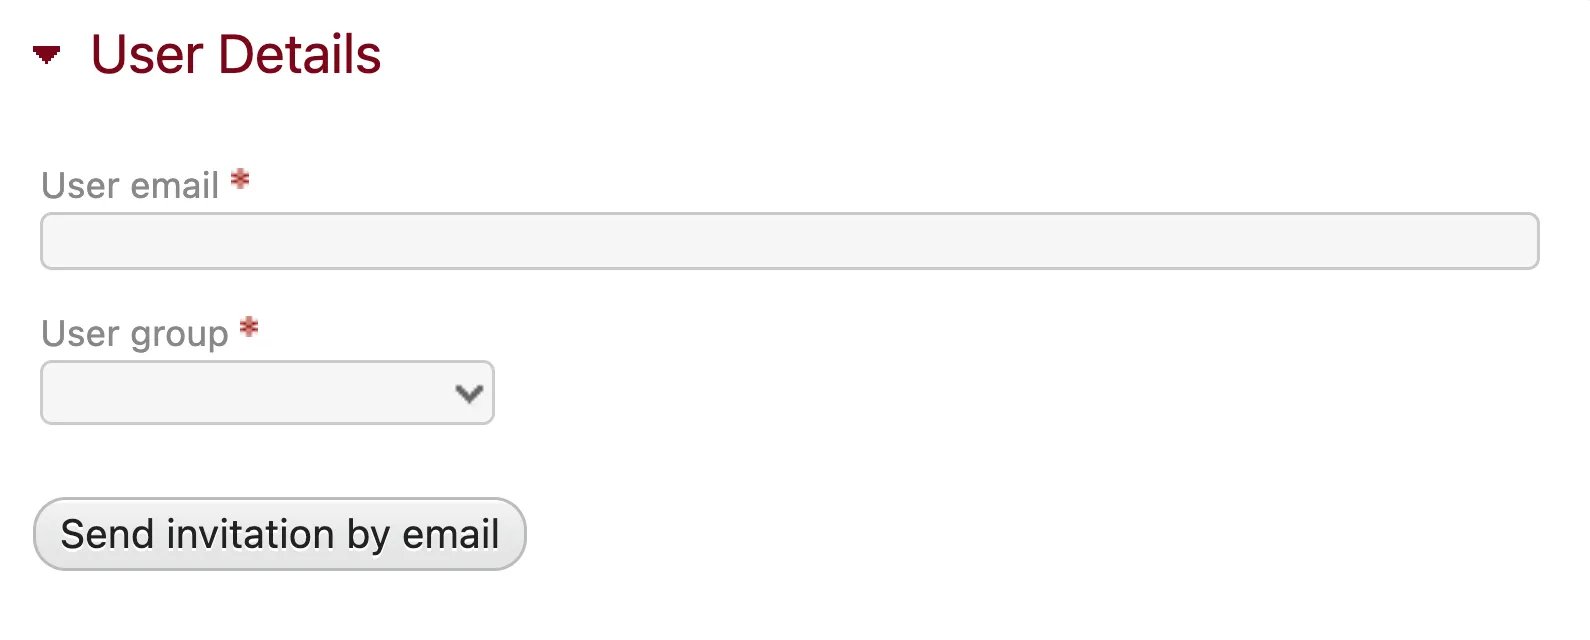
- In the User Details module, enter the person’s email address, select their user group, and click “Send invitation by email”. This person will receive an email invitation with a link to start using Beebole.\
Adding and Managing People
Inviting teammates
To add users to Beebole, go to your own company’s page or the page of the company branch you want to add people to. You must be an administrator to add users to the account.- Locate the People module and click “Add new person”. Type the name of the person and click the blue “Display” button.
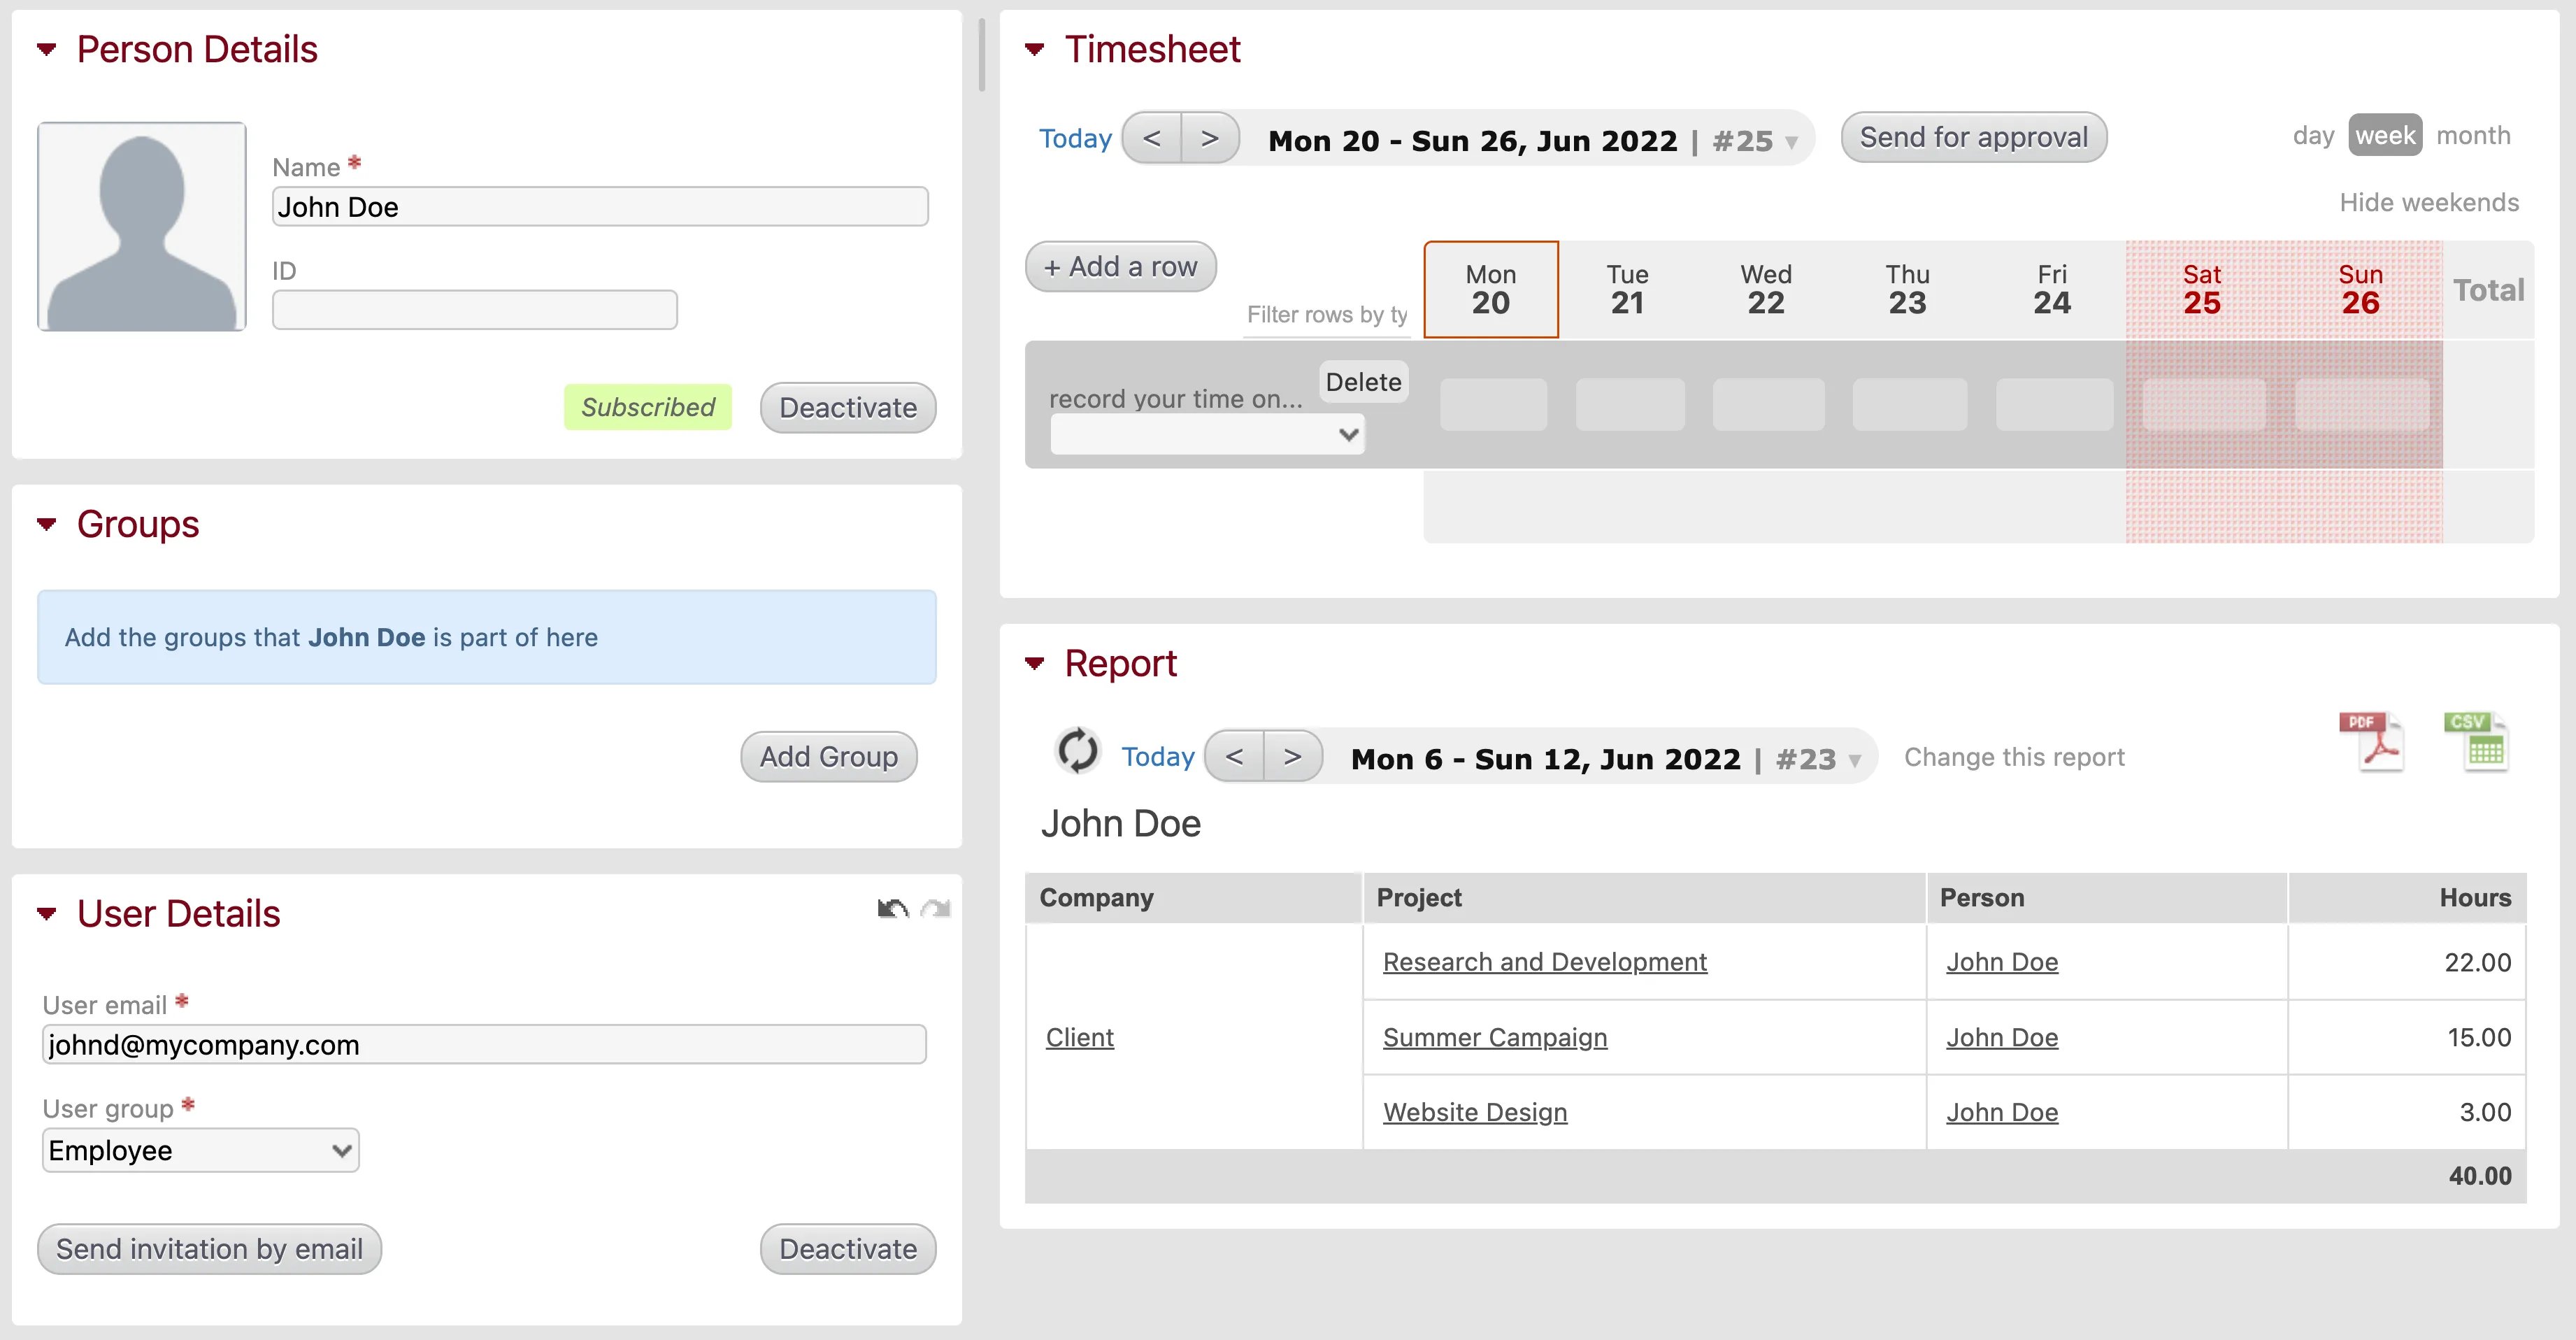
- You will be taken to the page for that person. Locate the User Details module (note that this is different from the Person Details module). Fill in the email address and user group (Administrator, Contractor, Employee, Team Leader, or Project Manager).
- Click “Send invitation by email” to send a login link to that person.
- Email invitations should arrive within a few minutes of being sent. Otherwise, try checking the spam or junk folder. Alternatively, you can copy and paste the URL that appears in the User Details module after you send an email invitation and share it manually.
- In order to add and save a person’s user group, you will also need to fill out the “User email” field. However, this does not need to be a valid email address for the information to be saved. You only need to enter a valid email address if you want to send an invitation to this user.
- If you use the People module to add people on a customer page, they will be added as contact people. These people are not users on your account, they will not count towards your subscription, and they cannot track time.
- You can also reset a user’s password by clicking “Send invitation by email” in the User Details module.
Assigning permissions and authorizations
The permissions and authorizations available to each user group can be configured in three ways:- By controlling the companies and projects visible in a person’s timesheet.
- By giving managers access to the projects and people they are responsible for.
- By configuring the modules available to each user group.
Organizing teams, departments, and offices
You can organize users into groups such as teams, departments, offices, etc. using the Groups and Groups Settings modules. Groups can be any category you want, and they can also be used for organizing companies and projects. Check our documentation to read more about how to create and assign groups.Tracking and Approving Time on Projects or Activities
Recording time on desktop
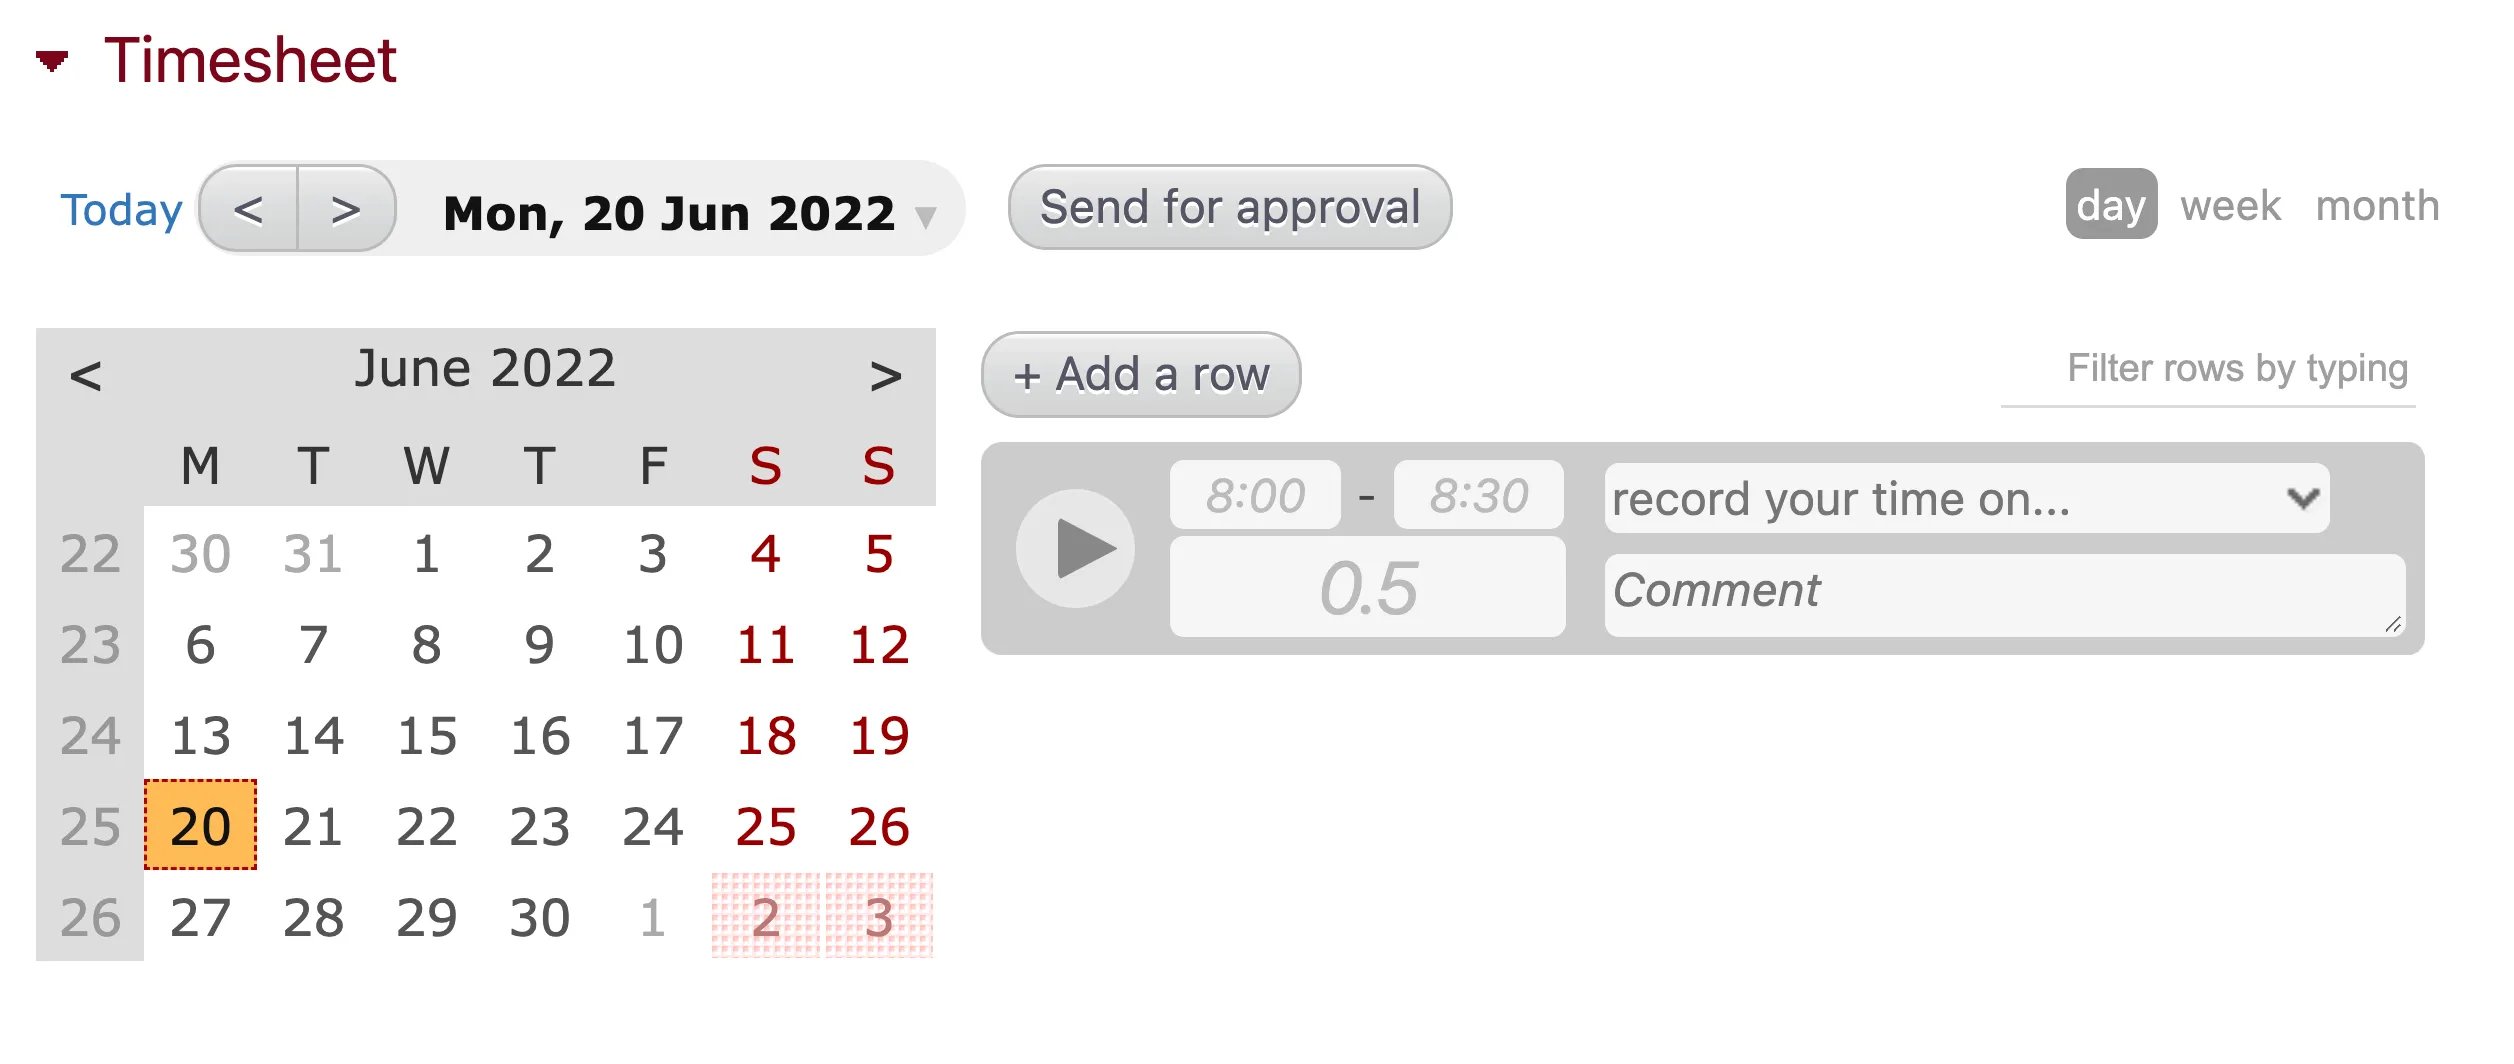
You can record time on a desktop using a daily, weekly, or monthly format. Select the format you’d like to use by selecting day, week, or month in the top right corner of the timesheet. To record time using any format, click Add a row and select an entity (a company, project, subproject, absence) using the dropdown menu labeled Record your time on. The menu will display all active companies and projects for which you have the right to record time, as well as all absences defined in your absence settings. Clicking on a company name will show its projects, just as clicking on a project name will show its subprojects.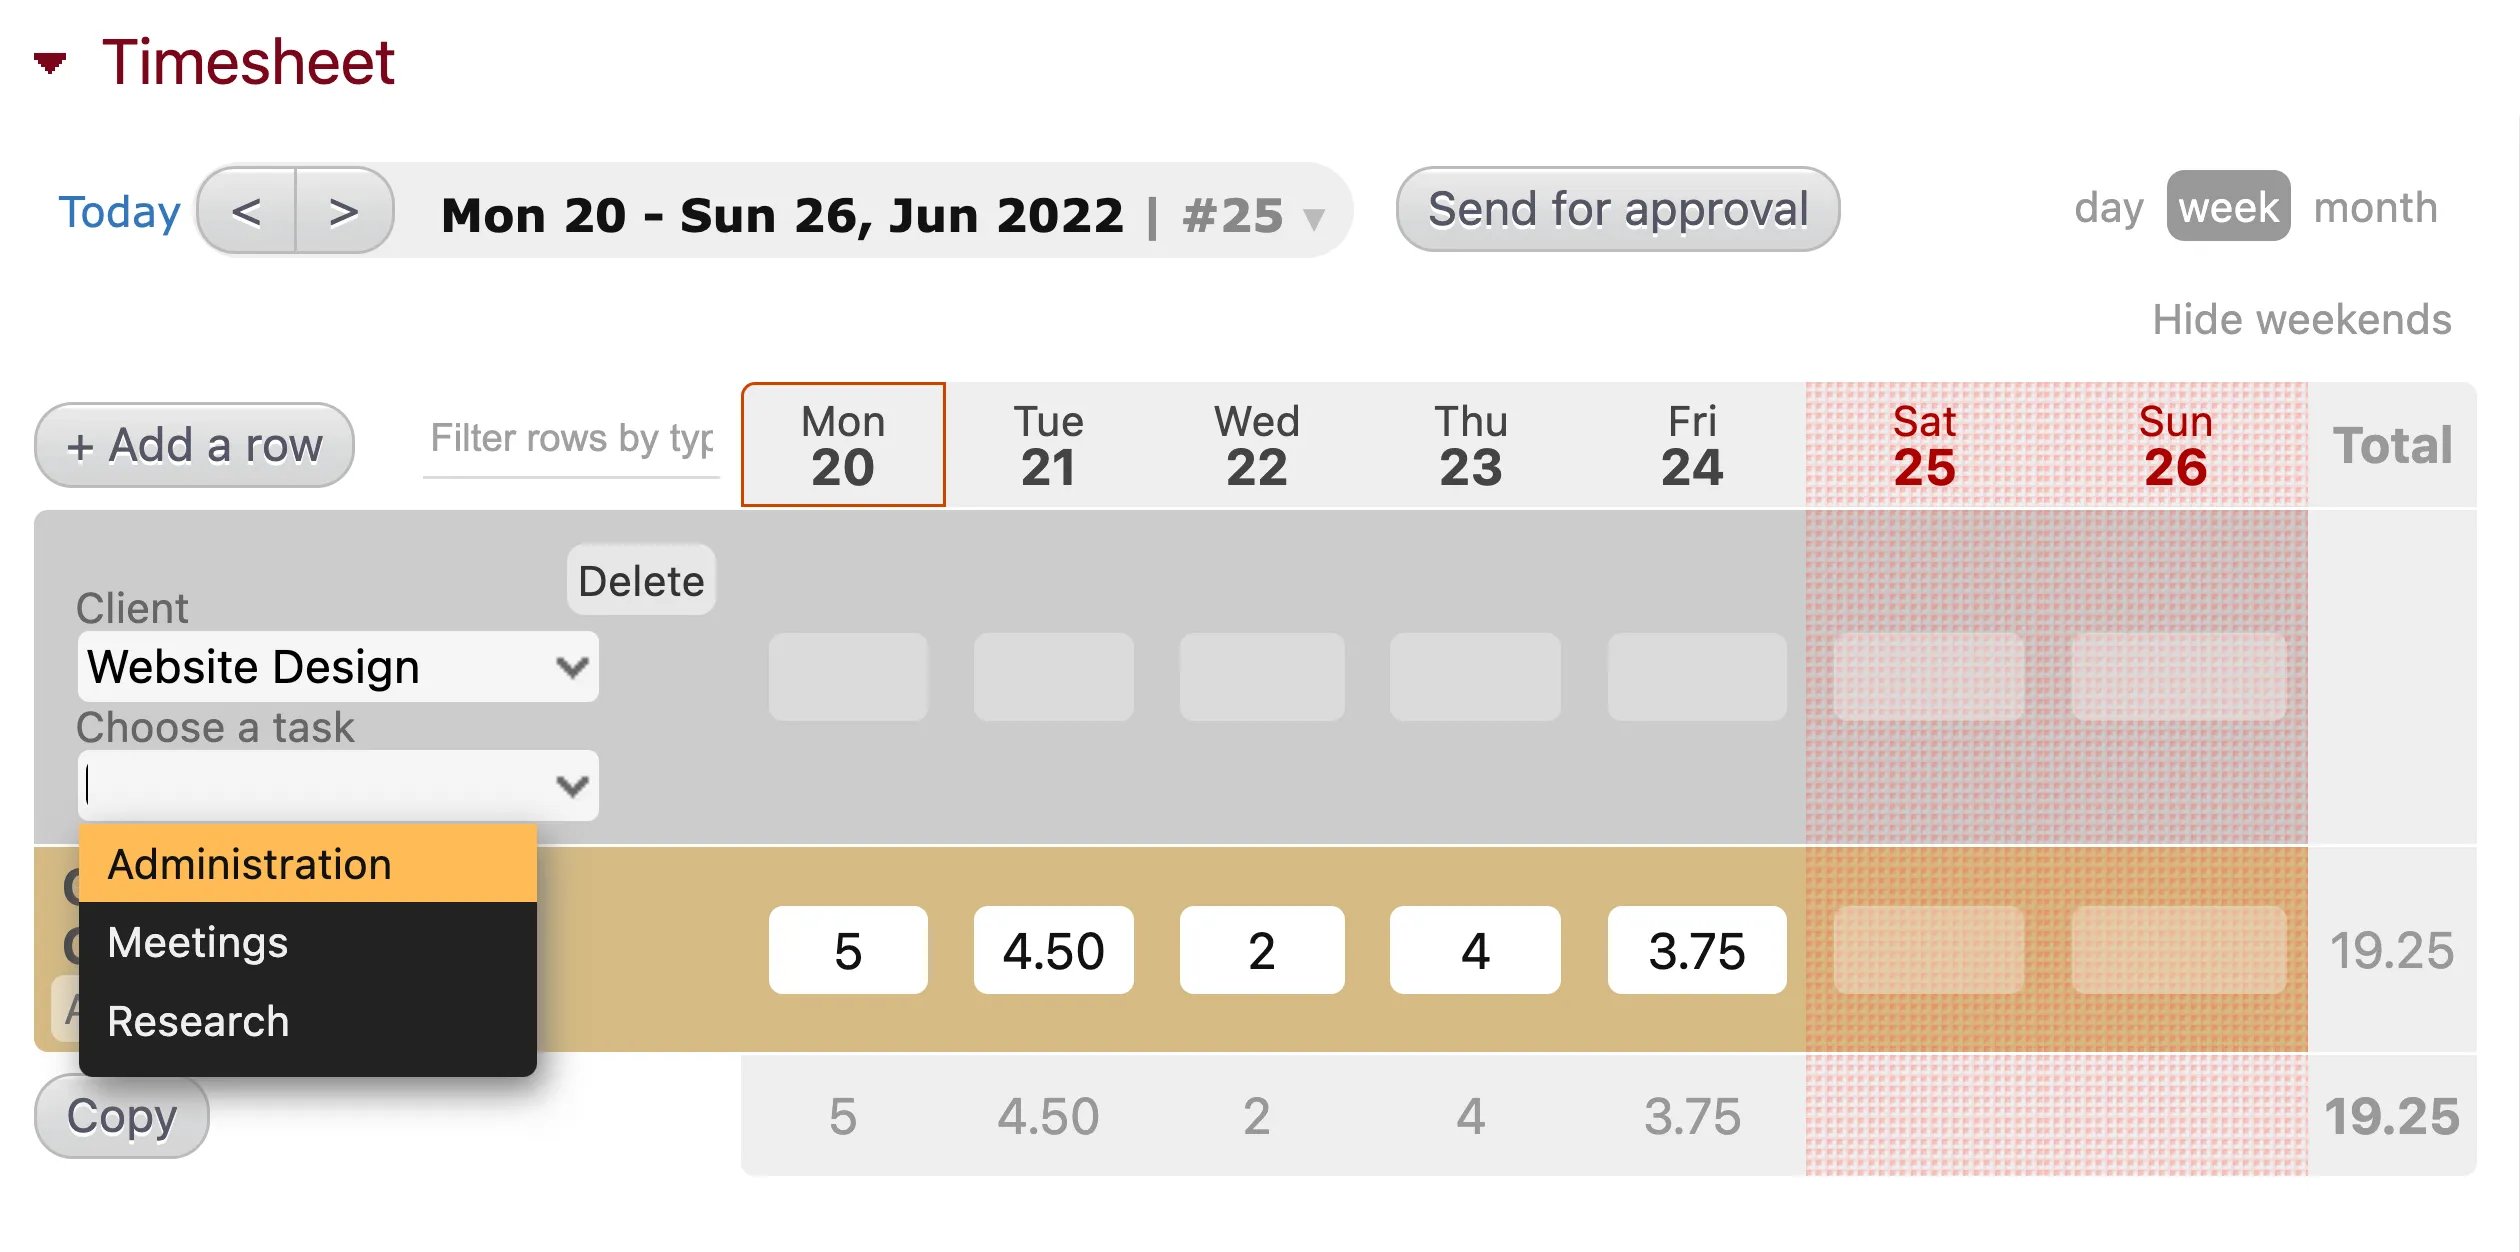
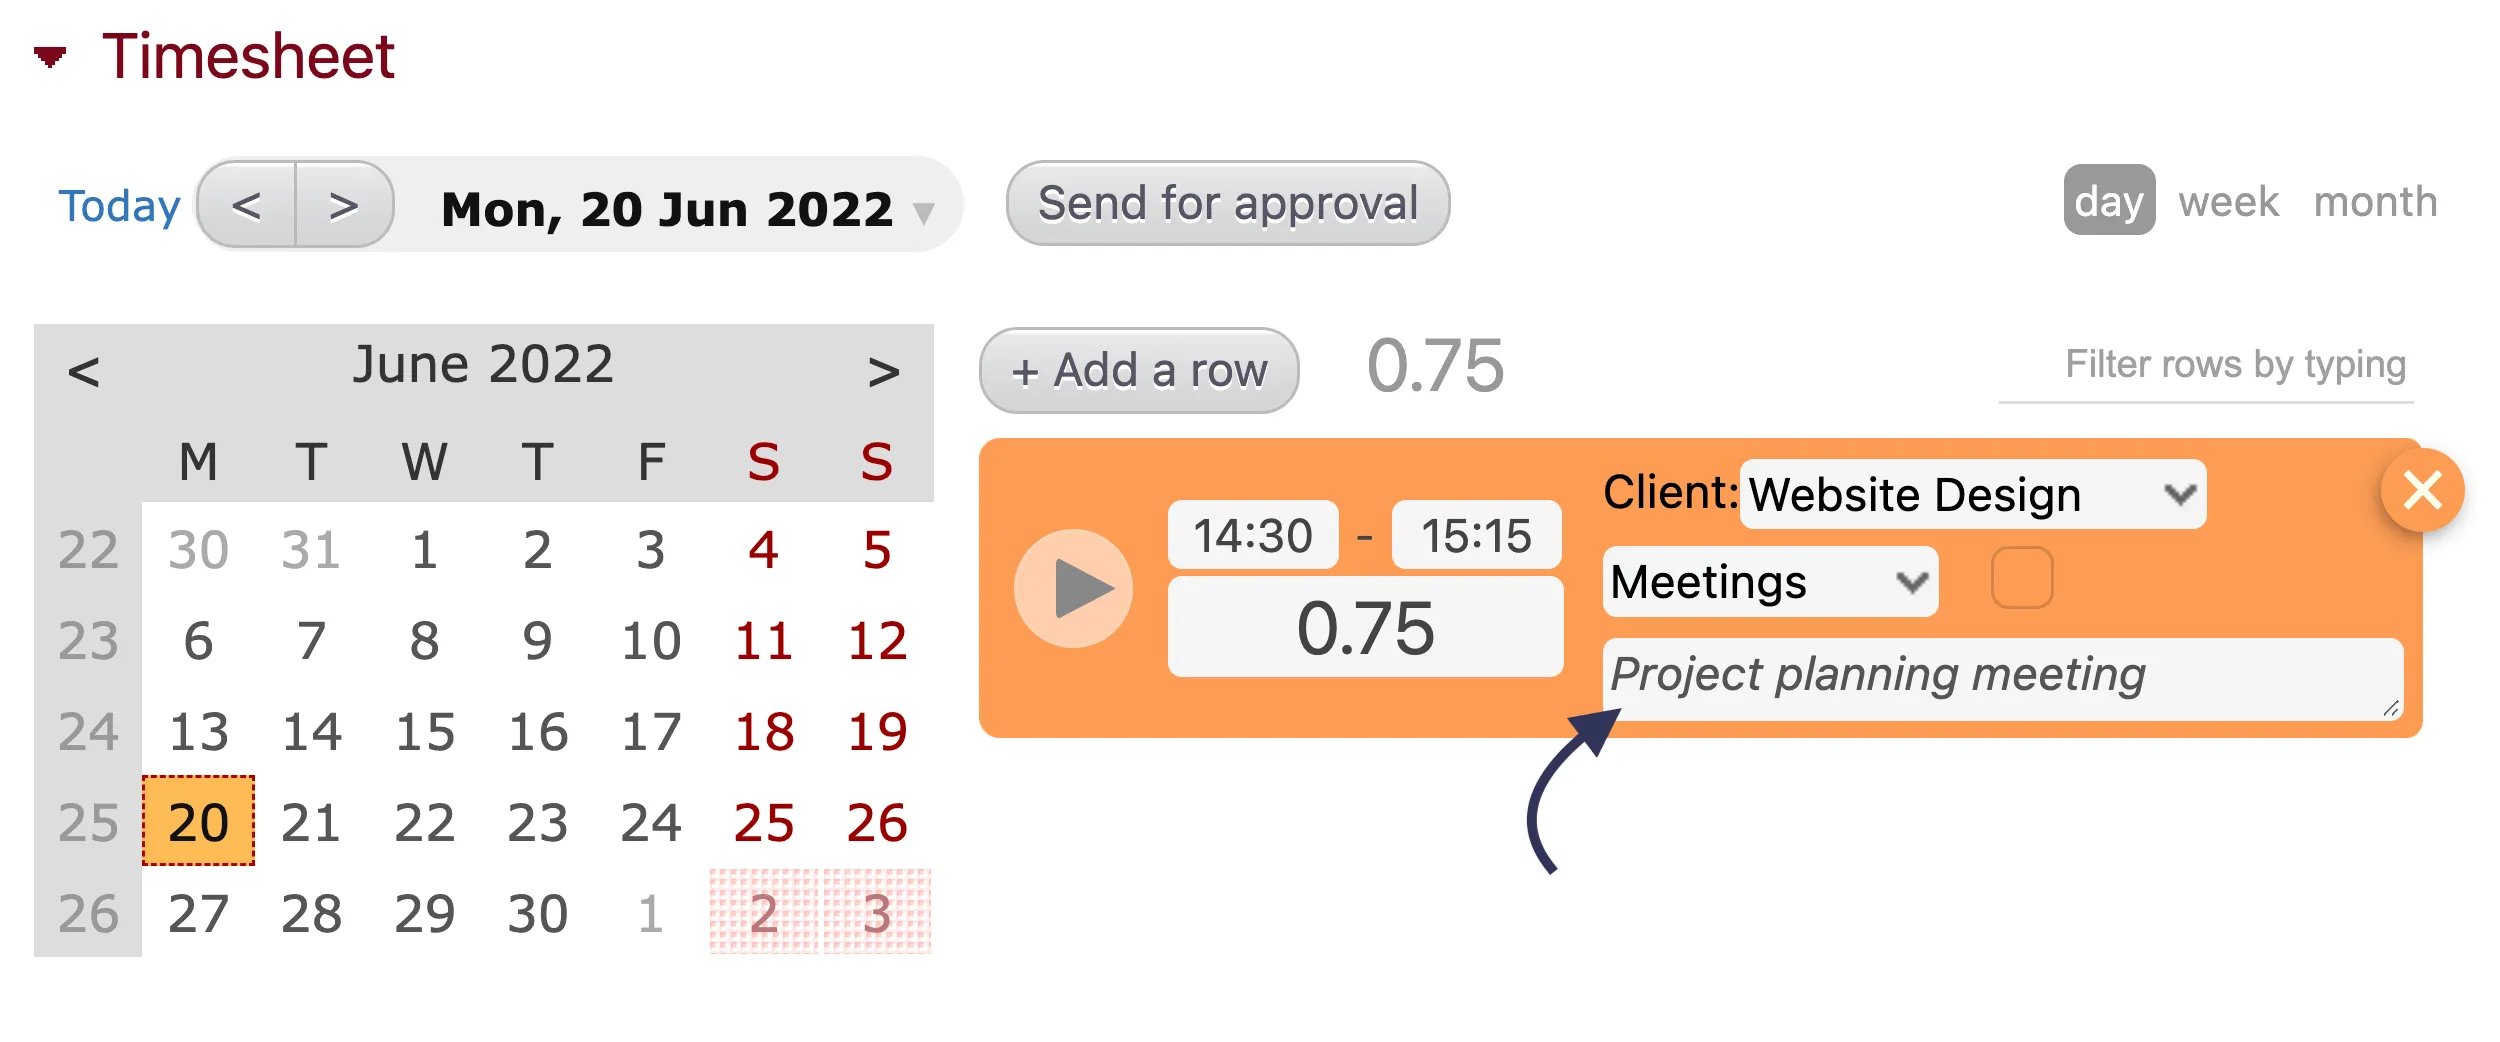
Tracking Time with a Daily Timesheet:
When recording time using the daily format, the fields you see will depend on your organization’s timesheet settings.- A single field to manually enter the duration of your work.
- A duration field and fields for start time and end time.
- A duration field with a timer.
- A duration field with a timer and fields for a start time and end time.

Tracking Time with a Weekly Timesheet:
When recording time using the weekly format, you can only enter the duration of the time worked. Again, you can use different formats to enter the duration, but it will be automatically converted to the format configured in your timesheet settings.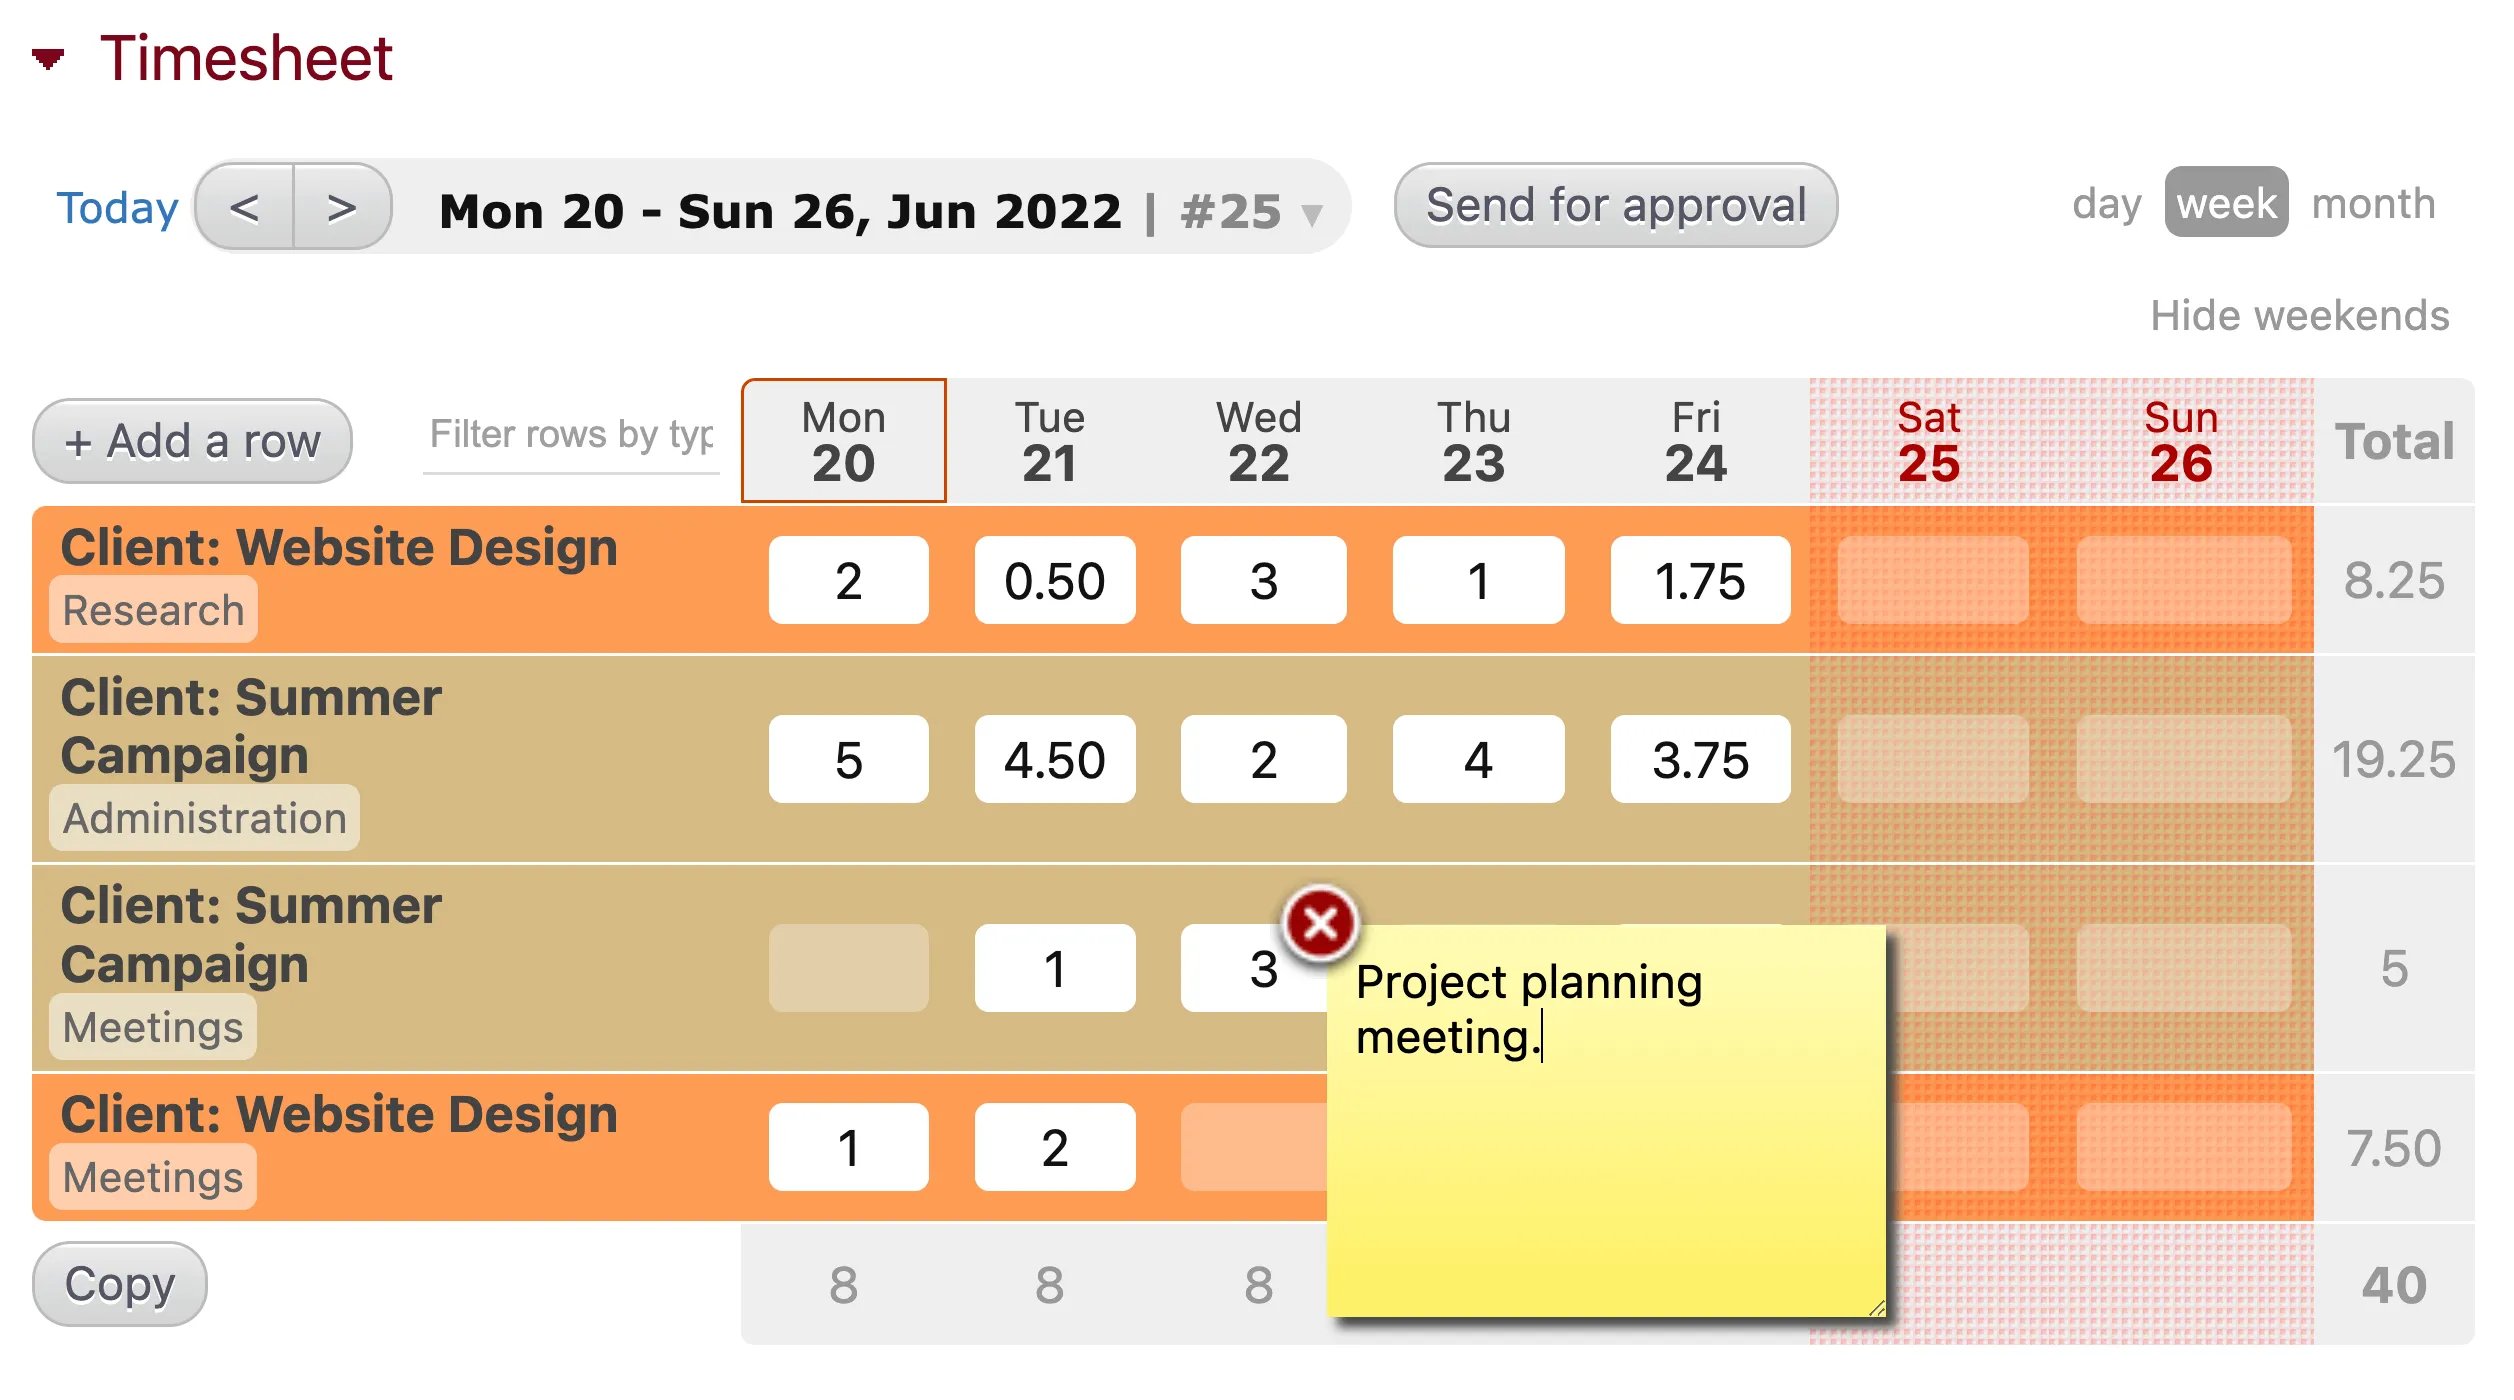
Tracking Time with a Monthly Timesheet:
When recording time using the monthly format, you can only enter the duration of the time worked. Click on a day to add a time entry. In the box that appears, fill in the activity, duration, and any comments, then click “Close”.
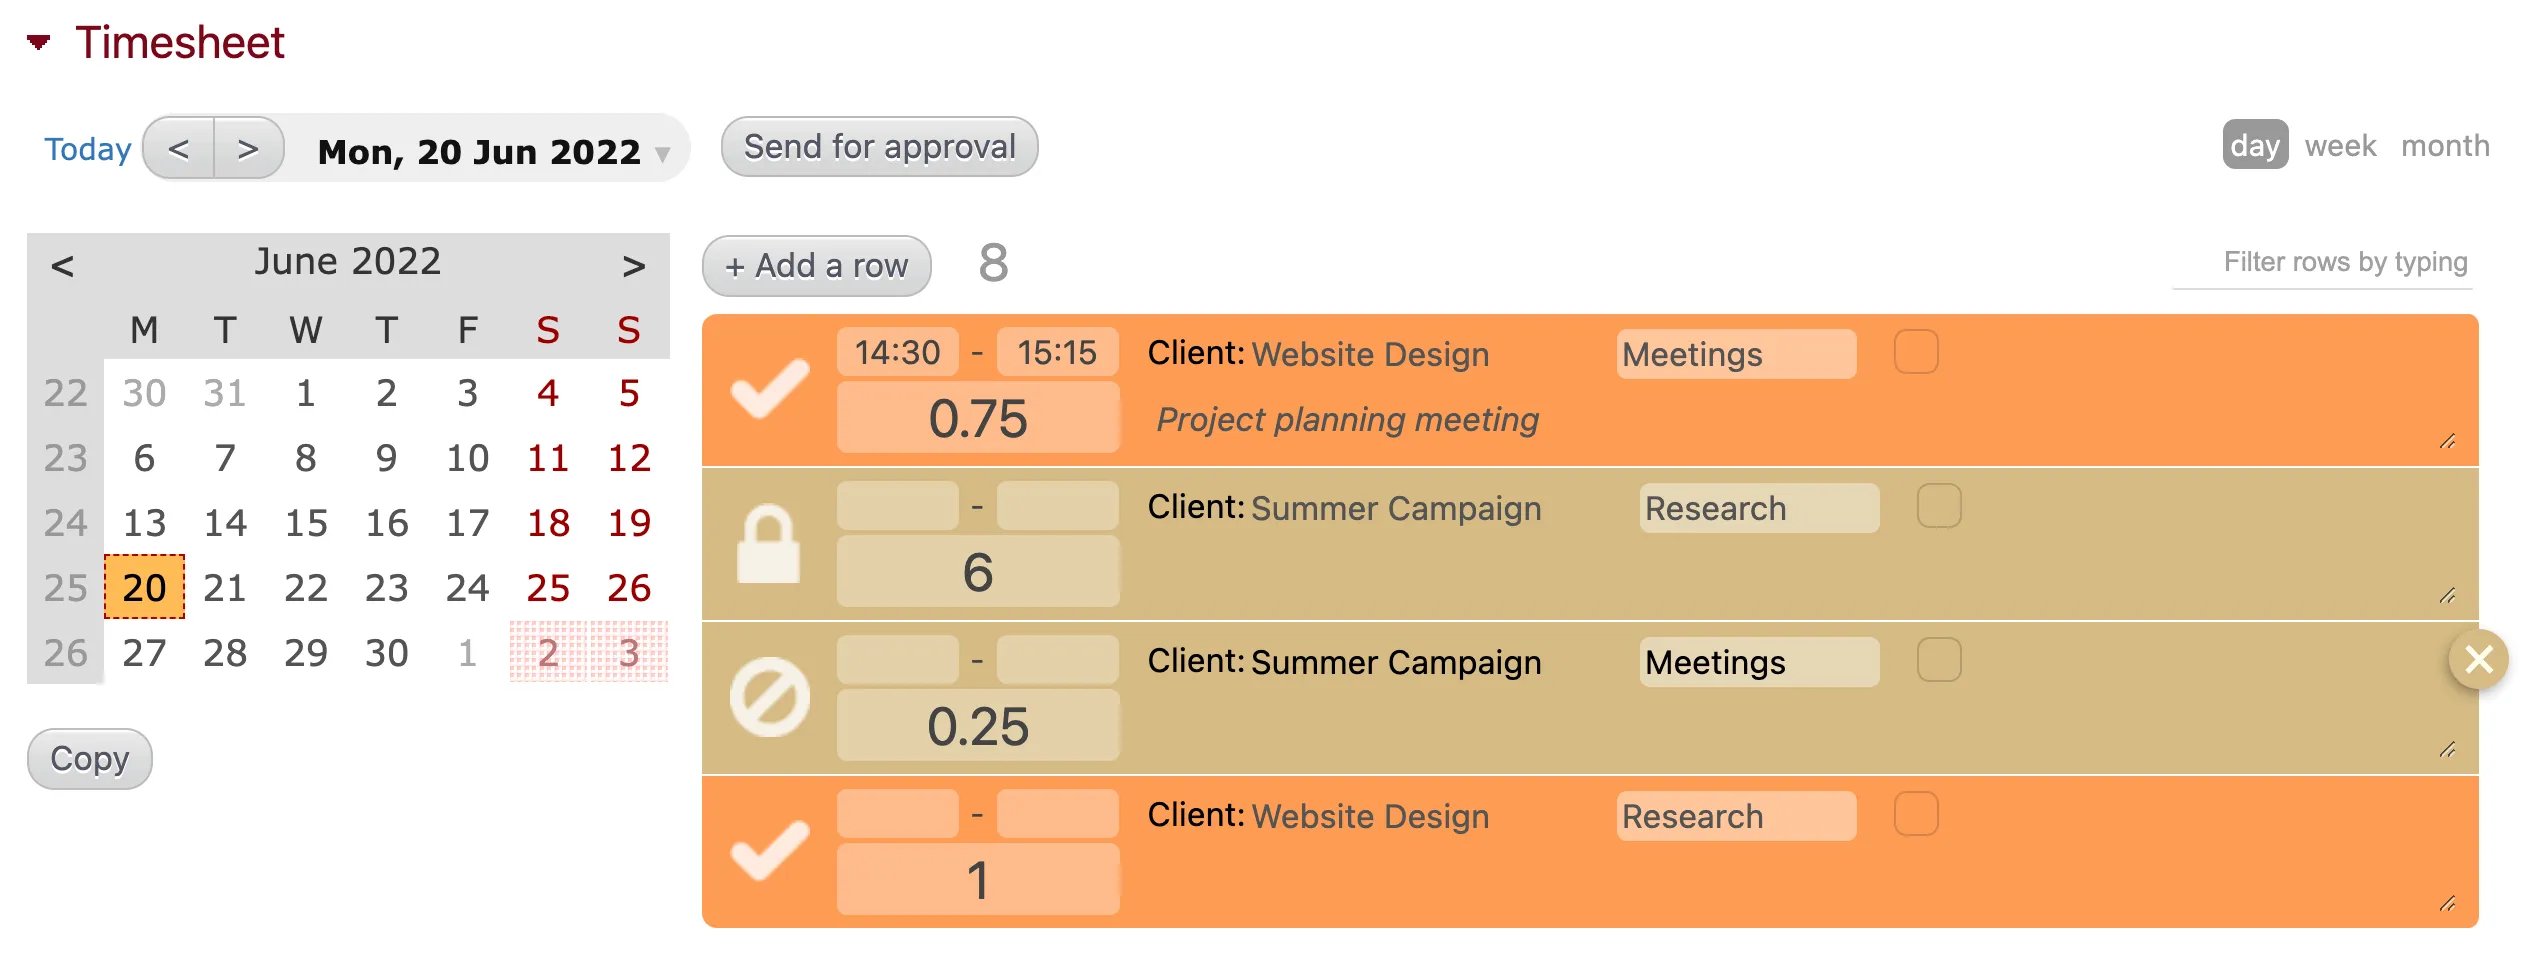
Submitting time on desktop
To submit hours on a desktop, click the “Submit for approval” button at the top of the Timesheet module. This will submit all tracked hours in draft mode (previously unsubmitted hours). You can undo this action for a few seconds after submitting by clicking “Undo”. Once submitted, a person will not be able to change these records unless they are rejected by a manager. Submitted hours that are still awaiting approval will appear with a question mark (”?”) beside them in your timesheet. Rejected hours will appear with a circle-backslash (”⍉”), approved hours with a check mark (”✓”), and locked hours with a padlock. Rejected hours can be modified or deleted. Approved and locked hours cannot be edited or deleted.