

Notification preferences are personal. You set yours from your own profile, and they cascade down through tags the same way other settings do, so a default can be set once on the organization or a tag and inherited by everyone beneath it. When nothing is set anywhere, both channels are on and every event is Instant.
What you get notified about
Beebole sends notifications for a fixed set of events. You control each one independently in your Notifications preferences.
When a timesheet you submitted is approved at its last stage or rejected, Beebole notifies you under Approval updates, through the channels you ticked: the Timesheet Approved or Timesheet Rejected email, a push notification, or both. A rejection carries the approver’s comment and a link to open the timesheet, correct it, and submit it again. Beebole also posts the decision to your Journal.
In a multi-stage workflow, the approvers of the next stage are notified as soon as the previous stage approves the timesheet.
A few notifications have no row of their own but still follow the channels you choose: timesheet and approver reminders, the warning before an unassigned task starts, the alert administrators receive when auto-submit fails on a period, and the notice you get when Beebole stops a timer you left running. That Timer Stopped email and push notification name the activity, the time the timer stopped, and the time logged, with a link to correct the entry on your timesheet.
How notifications reach you
Beebole delivers notifications through two channels, Email and Push notifications. Tick either or both at the top of the Notifications panel. Like the rest of the panel, the channels can be set on the organization, a tag, or a person, and are inherited like any other setting.- Email notifications arrive in your inbox. Approval emails include Approve and Reject links: Approve acts straight from the email and opens the timesheet it approved, while Reject opens the timesheet in Beebole with the rejection dialog ready, because a reason is always required. To reject without opening Beebole, reply to the email with “reject” followed by your reason. See deciding from your email. You can also reply to a Journal message email, and Beebole adds your reply to the right thread.
- Push notifications appear on your computer or phone even when Beebole is closed. They cover mentions, approval requests and decisions, reminders, and stopped timers. Clicking one opens Beebole on the related page. A push notification only reaches the devices where you enabled it. See Push notifications on your devices.
At least one channel must be on to receive notifications. Turn both off and the per-event preferences are hidden, because there is nowhere to deliver them.
Notification language
Emails and push notifications both arrive in the language each person uses in Beebole. Someone who has never picked a language gets the one Beebole is displayed in when they sign in, and Beebole saves it for them. To change yours, pick another language from the menu behind your initials at the bottom of the sidebar. Sign-up and sign-in code emails use the language of the page you request them from, and an invitation goes out in the language of the person who sends it. An email whose template an administrator customized is sent as written, whatever the recipient’s language. See Email templates.Unsubscribing from emails
Every notification email ends with an Unsubscribe link, and mail clients that offer one-click unsubscribe show their own button for it. Either one turns off the Email channel in your own notification settings. Push notifications are not affected. To receive emails again, tick Email in your Notifications panel.Push notifications on your devices
Ticking Push notifications turns the channel on, but each device also has to be enabled once, because the browser asks for your permission before Beebole can notify you there. When Push notifications is ticked in your own Notifications panel, a device list appears below the channels:- This device shows whether the browser you are using is Receiving notifications or Not receiving notifications. Click Enable on this device to turn push on for it (the browser asks for permission), or Remove to stop push on it.
- Other devices lists the other browsers and devices where you enabled push, with the date each one was added. To stop push on one of them, open Beebole on that device and click Remove there.
Beebole drops a device on its own when its browser no longer accepts notifications. Signing out stops your notifications on that device, and signing in again brings them back without a new permission request.
The Get notified on this device prompt
When push is on in your settings but the device you are using isn’t enabled yet, Beebole offers to enable it with a Get notified on this device prompt in the top-right corner. It appears once you come back to Beebole on that device on a second day, and only while the browser hasn’t yet allowed or blocked notifications for Beebole.- Click Enable to turn push on for the device. The browser then asks for permission.
- Click Not now to hide the prompt. The first time, it stays hidden for a month. The second time, it doesn’t come back on that device.
Choosing how often you’re notified
For each event, you pick how often Beebole notifies you. The frequency applies to both channels: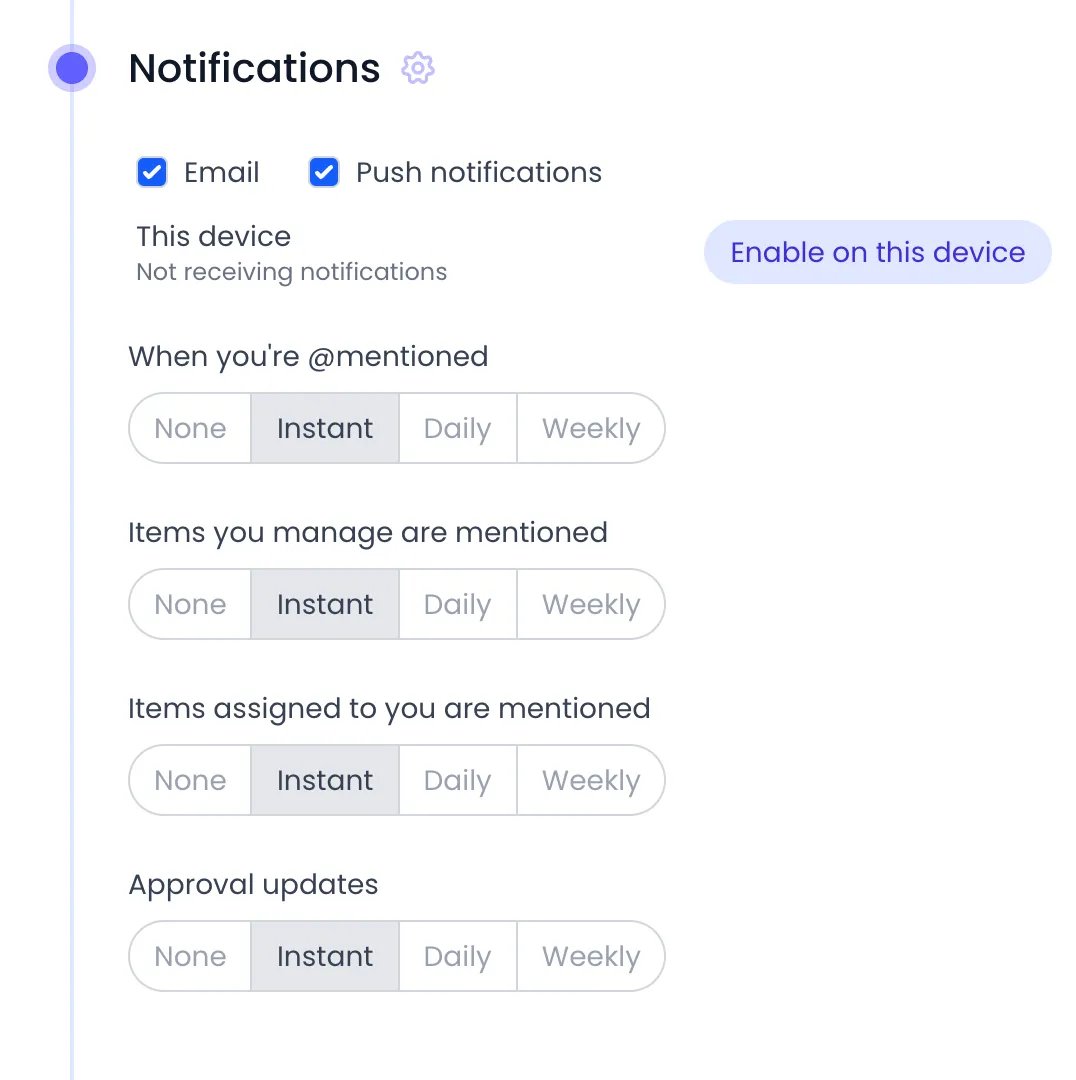
Your Notifications panel, with both channels and a frequency for each event
Daily and weekly digests reduce inbox volume by grouping events into one message instead of sending one email per event. On push, a digest arrives as one notification that says how many new notifications are waiting.
1
Open your Notifications preferences
Open your own profile, then open the Notifications panel.
2
Choose your channels
Tick Email, Push notifications, or both. At least one must be on to configure events. Ticking Push notifications also turns push on for the device you are using. The browser asks for your permission first if you haven’t answered it before.
3
Set a frequency per event
For each event, choose Instant, Daily, Weekly, or None. For Daily and Weekly you also pick the delivery hour, and for Weekly the day of the week.
Your preferences save automatically as you select them — there is no separate save step. To apply the same frequency to every event at once, hold the meta key (⌘ or Ctrl) while clicking a frequency.
When many alerts fire at once
Instant never floods your inbox or your notification center. When more than three notifications of the same kind are waiting for you at the same moment (a whole team submitting their timesheets, for example), Beebole collapses them into one summary instead of one message each. By email, the summary uses the same layout as a digest: it lists the first eight items of each kind, then a count of the rest, with a link to open Beebole. On push, it is a single notification that says how many are waiting. If another burst of the same kind follows within the next 15 minutes, it is held and delivered as one further summary once that window closes, so a long-running import or a busy afternoon never turns into a stream of near-identical emails.Email summaries are built from the Digest email template, so any wording you customize there also applies to these bursts.
Timesheet reminders
Reminders are configured by administrators in Timesheet and Planning Settings, not in personal preferences. They prompt people to submit their timesheets and nudge approvers about pending work. They reach each person through the channels ticked in their notification settings. Reminders to submit go only to people who have an approval workflow, since without one there is nothing to submit.1
Open Timesheet and Planning Settings
Open the organization, a tag, or a person, then open the Timesheet and Planning Settings panel and select the Reminders tab.
2
Remind people to submit
Next to Remind to submit, choose Start of next period or End of current period, then set the hour the reminder is sent. Click the selected option again to turn it off.
3
Remind approvers
Set Remind approvers after a number of days if not yet approved to chase pending approvals automatically.
Reminder settings save automatically and cascade like other timesheet settings — set them once on the organization and they apply everywhere, or override them on a tag or person.
Email templates
Administrators can customize the wording of the emails Beebole sends. Email templates live in the Email templates panel, where each email type has its own tab: Sign Up, Sign In, Invite, Mention, Timesheet Submitted, Timesheet Approved, Timesheet Rejected, Reminder, Approval Reminder, Digest, and Timer Stopped.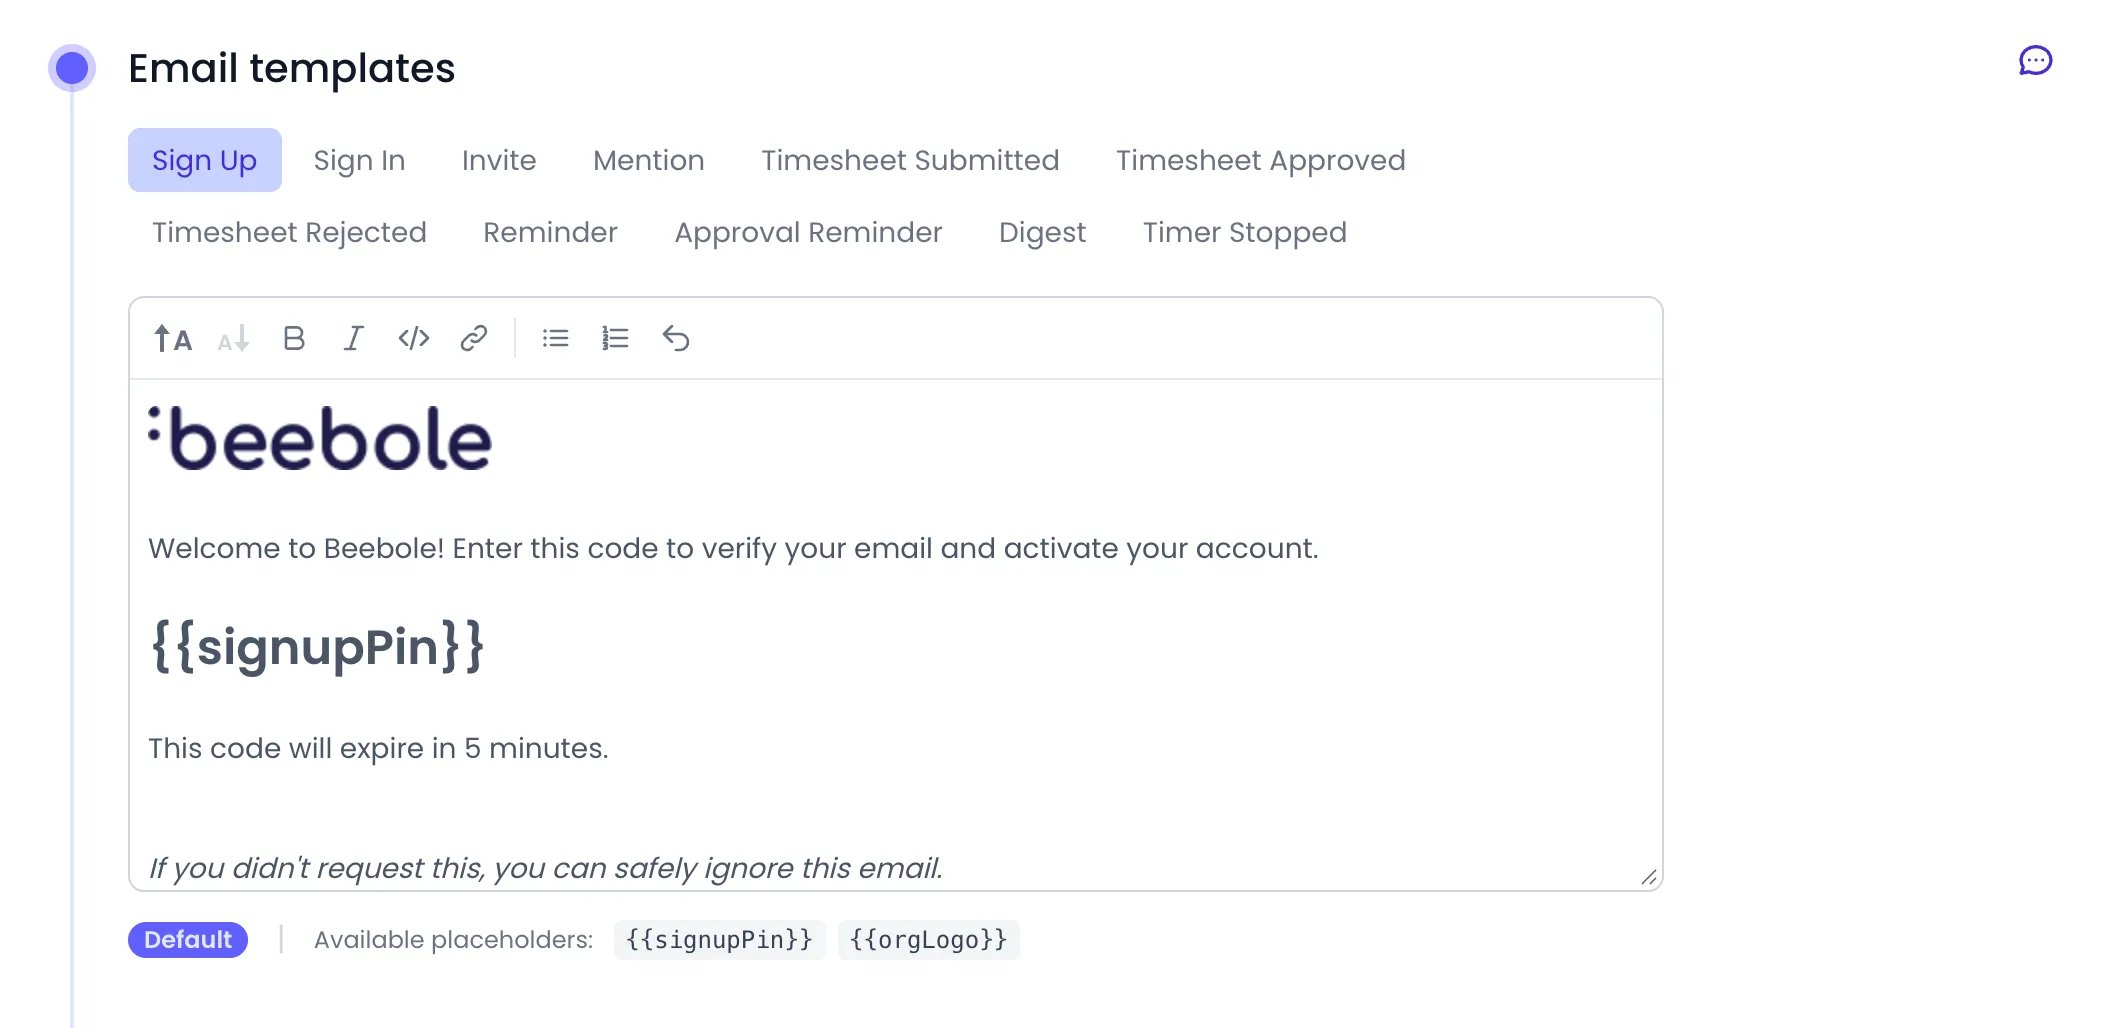
The Email templates panel in Account Settings, on the Sign Up tab
1
Open Email templates
Open the organization or a tag, then open the Email templates panel.
2
Pick the email type
Select the tab for the email you want to change.
3
Edit the content
Edit the text in the editor. Insert the listed placeholders (for example, the recipient’s name or an action link) where you want Beebole to fill in real values.
Template edits save automatically as you type. To revert a customized email to Beebole’s built-in wording, choose Reset to default template. Templates inherit down through tags, so a custom template set higher up applies to everyone beneath it unless overridden.
Reliable delivery
Beebole delivers notifications through a background queue so a temporary network or service hiccup does not lose them. If a notification fails to send, Beebole retries it automatically up to three times before marking it as failed. No action is needed on your side — delayed notifications are redelivered once the issue clears. Notifications only go to people who actually belong to the organization, with an active account or a still-valid invitation. Archived people are excluded, so departed team members never receive notifications about an account they left.Related content
Journal
@Mentions, approval events, and reminders all appear in the Journal feed.
Approval
Approval updates and approver reminders are tied to the timesheet approval workflow.
Mobile
Install Beebole on your phone, including on the iPhone Home Screen for push notifications.
Budget Status report
Where projects approaching or over their budget are flagged, with no setting to switch on.
Frequently asked questions
Can I turn off all notifications?
Can I turn off all notifications?
Yes. In your Notifications preferences in Beebole, untick both Email and Push notifications, or set every event to None. Either way you stop receiving notifications for those events. The unsubscribe link in a notification email turns off email only, and push notifications keep coming until you untick Push notifications too.
How do I get Beebole notifications on my phone?
How do I get Beebole notifications on my phone?
Tick Push notifications in your Notifications panel, then open Beebole on your phone and click Enable on this device in the same panel, or Enable in the Get notified on this device prompt. On an iPhone or iPad, first add Beebole to the Home Screen from Safari’s Share menu and open it from there, because push notifications don’t work in a Safari tab. See installing Beebole on iPhone or iPad.
Who sets up timesheet reminders?
Who sets up timesheet reminders?
Administrators set timesheet reminders in Beebole’s Timesheet and Planning Settings panel, on the Reminders tab. Reminders prompt people to submit timesheets and chase approvers about pending work, and they cascade from the organization down through tags and people.
Can I respond to a notification by email?
Can I respond to a notification by email?
Yes. In Beebole’s approval emails, Approve approves the timesheet straight from your inbox. Reject opens the timesheet in Beebole with the rejection dialog, because a reason is required, or you can reply to the email with “reject” followed by your reason. Replying “approve” approves it too. You can also reply to a Journal message email directly, and Beebole adds your reply to the right thread.
Does Beebole tell me when my timesheet is approved or rejected?
Does Beebole tell me when my timesheet is approved or rejected?
Yes. When your timesheet is approved at its last stage or rejected, Beebole notifies you under Approval updates, by email, push notification, or both, depending on the channels you ticked. A rejection includes the approver’s comment and a link to open the timesheet, correct it, and submit it again. The decision also appears in your Journal.
Which language are Beebole notifications sent in?
Which language are Beebole notifications sent in?
Beebole sends emails and push notifications in the language each person uses in Beebole. If someone never picked a language, Beebole saves the one they sign in with. Sign-in code emails follow the language of the sign-in page, and an email template an administrator customized is sent as written to everyone it applies to.